use CRTL-F for
your browser's search facility
jDBexport - version 4.0.x - user manual
This is the user manual for jDBexport (version 4.0.x). It is considered work-in-progress and is continously updated and enhanced. Most of the described features are identical to those in the versionbranches 3.2 and 3.1.x, so if you still have 3.2.x or even 3.1.x in place, you can use this user manual as well (although some features described here may not be available in those versions).
We devide this manual into three parts
- Main funcitonality (where only the most important basics are described)
- Detailed instructions (where individual features are described in all possible details)
- Apendix (where you find additional information on certain topics)
Please note that screenshots are taken from our DEMO website and may differ depending on layout templates and product versions. This documentation is written to our best knowledge, but if you spot mistakes please inform us (and we will correct them).
Table of content
MAIN FUNCTIONALITY
Introduction
jDBexport is a Joomla component which allows you to export data from your databases (JOOMLA and others). The reports are generated on-demand into an Excel document, when the users request them.
jDBexport allows you to deliver data from your databases directly to your users. Write any valid SQL query in the backend administration of this component. The query is run when a user clicks the link and the current information in the database is delivered to the users browser as as a document in one of the following formats, depending on your selection:
- Microsoft Excel 2007 (*.xlsx)
- Microsoft Excel 2003 (*.xls)
- OpenDocument spreadsheet (*.ods)
- Comma-Separated-Values (*.csv)
- Hypertext Markup Language (*.html)
- Portable Document Format (*.pdf)
- Javascript Object Notation (*.JSON)
To make the most of this reporting component, you should have a basic knowledge of the SQL database language (see Structured Query Language on Wikipedia) and it's usage in your own RDBMS (Relational database management system, most probably one of the following: MySQL, MariaDB, ORACLE, SQL Server, SQL:2008, PostgreSQL, Firebird, SQLite, DB2, Informix).
Although it is not the scope for this user manual to describe the usage of SQL, we still do include a short chapter with some very basic guidance. For further reading you can always refer to SQL Beginner's guides in bookstores...
Terminology used
jDBexport uses certain terms in a defined way. It helps understanding the features, if you know what we mean by them.
Worksheet
Workbook
Document
A document is generally the same as a workbook.
For any questions about this manual or the jDBexport component, please contact us at:
Schultz IT Solutions, Salztorgasse 7 Top 9, 1010 Vienna, Austria, This email address is being protected from spambots. You need JavaScript enabled to view it.
New and enhanced features
- version 4.0.3:
PhpSpreadsheet fully implemented
jDBexport is now compatible with JOOMLA 4 and PHP8 - version 4.0.0:
Implementation of the new PhpSpreadsheet library (successor of PHPExcel) - currently ONLY EXPERIMENTAL
New service integrated to view the documents (only xlsx and xls) through Microsoft Excel Online - version 3.2.10:
Joomla Update-Server implemented (checking for updates) - version 3.2.9:
security enhancement "sensitive object" feature. Only superusers are allowed to "see/edit" such objects in the administration backend - version 3.2.8:
deleting multiple files from the documents cache directory
new progressbar when downloading or GoogleDocViewing complex documents
new database driver for PHP PDO database driver (currently supporting ODBC/MSSQL and ODBC/MySQL) - version 3.2.7:
Downloading documents can be secured with .htaccess files (or similar methods) - version 3.2.6:
no new features, but some bugfixes ;-) - version 3.2.5:
Downloadpage can now render modules - version 3.2.4:
supporting *.ods as a new document format, supporting SQLite3 as a new database driver, fully support PHP7
supporting sqlite3 databases with native
SQL queries support STORED PROCEDURES with EXECUTE - version 3.2.3:
implemented new method to execute all existing schedules in one cronjob call - version 3.2.2:
implemented new method to create workbooks without downloading them (for follow up processing of such workbooks) - version 3.2.1:
jDBexport can now embed diagrams and charts directly from your data
database driver for MariaDB - version 3.1.7:
implemented the Google DocViewer as additional method to present your workbooks
add any additional files (like Excel Makro *.xlmx files) together with your compressed workbook - version 3.1.6:
new runtime parameter type: DATETIME
live SQL syntaxcheck now also available for extracells and runtime parameters - version 3.1.5:
define AUTOFILTERs for your worksheet - version 3.1.4:
implemented new method to create workbooks as independent "background process"
implemented a reduced Excel library to efficiently create Excel XML documents for large worksheets
Installation
Please note that jDBexport 3.2.x or later requires JOOMLA 3.3.0 or later (Joomla 3.7 preferred). jDBexport is fully compatible with PHP7 and PHP8
The installation utilises the JOOMLA standard installation procedure and can be installed using the JOOMLA extension manager.
Navigate to our Download aera, where you will find all installation packages. Currently there are three different packages available:
- pkg_jdbexport.V4-0-x.JOOMLA3x.zip
- mod_jdbexport_ttfonts.V4-0-x.JOOMLA3x.Unzip-and-Customize-First.zip
pkg_jdbexport.V4-0-x
This is the main package, containing the jDBexport component, the frontend and the backend modules, and also the datagrid, datafield and workbook-link plugins. For detailed descriptions on these modules and plugins, please refer to the Frontend functionality chapter of this manual.
mod_jdbexport_ttfonts.V4-0-x
This package contains additional TTF fonts for usage when creating PDF documents, and everything you need, if you wish to use other, individual fonts in your PDF documents.
Notes:
 The versionbranch 3.2.x of jDBexport reached it's end-of-support in september 2019, six months after the release of the current versionbranch 4.0.x
The versionbranch 3.1.x of jDBexport reached it's end-of-support in june 2015, the latest version in this versionbranch is pkg_jdbexport.V3-1-8 .
The versionbranch 3.0.x of jDBexport reached it's end-of-support in january 2015, the latest version in this versionbranch is pkg_jdbexport.V3-0-5 .
We removed these outdated versions from the customer accessible download area (to avoid new customers being confused and start using these versionbranches). If however you as a customer with active subscription, need these versions, just send us an email and we will be happy to deliver them to you.
The package you downloaded will decide whether an UPDATE or INSTALL is required depending on the the existence of a previous version (an UPDATE will not alter your data like categories, worksheets, workbooks, additional databases, schedules and settings).
AFTER INSTALLATION: do not forget to open the [Options] toolbar button and set the desired configuration options (see Configuration for details).
Migration from previous versions: An automatic migration to jDBexport 3.1.x or higher from either jDBexport 3.0.x or the predecesor product SQL2Excel is not available, a manual migration however is provided.
Update
Updating jDBexport is (usually...) straightforward. Simply download the latest package and use the Joomla standard installation feature.
At this time, the Joomla Extension Directory (JED) is giving one more step to improve security practices. Following the Security Checklist practice to Update early and often, on January 10th 2017, all extensions listed on the JED are required to use the Joomla Update System. With regards to extensions already listed on JED, they will not be unpublished if they are not in compliance with this new requirement. Instead, a popup warning will be shown to users when clicking the Download button, informing them that the extension doesn't support update servers and therefore must be updated manually.
To comply with this requirement, we implemented the Joomla Update System for jDBexport. In the download area on our website you see your so called Download ID (a unique string connected to your active subscription), right above your personal download link for jDBexport. Copy this string into the respective parameter in the jDBexport component options [Security] tab. If this is done correctly, you can use the Joomla Updater to get the latest versions of jDBexport. Please note that this Download ID is connected to your active subscription and needs to be updated after you renew your subscription!
Please contact us, if you do not see this download ID !
Configuration
jDBexport uses a wide varity of configuration options. This options are accessible through the components toolbar button [Options]. We describe all configuration options here in brief and (if available) link to other sections of this manual where they are described in more detail. Most of the configuration options are used in advanced circumstances, but we hereafter marked the most important configuration options with a  icon.
icon.
We have (currently) seven individual tabs in the component's [Options] dialog:
- Categories
- Worksheets
- Workbooks
- Schedules
- Advanced
- Security
- Permissions
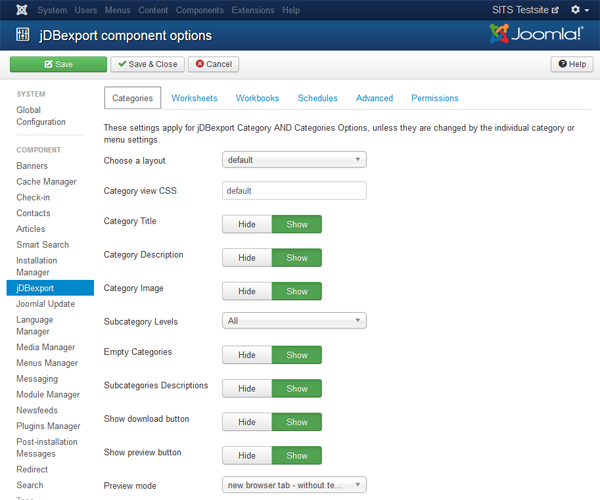
Categories configuration
Most of these configuration options are similar to those you know from core components such as "articles" or "weblinks". Only a few are individual to jDBexport.
Category view CSS
In this text field you can write the name of a CSS file, which will be used to render the frontend views (such as the "Categories" and the "Category" view, the "Preview"). For detailed instructions on how to utilise this, please jump to Advanced configuration possibilities .
Show download button
This allows you to generally make the download button visible on the [Category view] or not.
Show background process button
This allows you to generally make the background processing button visible on the [Category view] or not.
Microsoft Excel Online button
This allows you to generally make the Microsoft Excel Online button visible on the [Category view] or not.
Show preview button
This allows you to generally make the preview button visible on the [Category view] or not.
Filter Field
Activating this option will show an input field above the category view, where the user can enter a term to filter the list below.
Worksheets configuration
Substitute in SQL queries
This allows you to set whether or not variables or runtime parameters should be substituted by their actual values in SQL queries.
Substitute worksheet extracells
This allows you to set whether or not variables or runtime parameters should be substituted by their actual values in extra cell contents.
Show SQL helptabs
This allows you to show (or hide) the four SQL help tabs below the main SQL query.
Default help tab
If you set the above option to YES, this option here allows you to set which SQL helptab should be shown by default
Live SQL syntaxcheck
This allows you to activate or deactivate the Live SQL syntax check feature.
Color palette
In this text field you can write the name of a color palette file, which will be used for the color picker when defining worksheets. For detailed instructions on how to utilise this, please jump to Advanced configuration possibilities .
Make hyperlinks clickable
This allows you to activate or deactivate clickable hyperlinks in your worksheets, if your SQL query creates the corresponding links. For details on how to do that please visit the Making hyperlinks active in worksheets chapter further down in this document.
Advanced row/col variables
Advanced row and col variables are additional substitution variables for some coordinates relative to the current row/column. To calculate them, additional execution time is needed. So you should activate this only if you actually need it for your worksheet.
Convert to UTF8
This option allows you to convert "unicodes" (such as \u00fc ) and/or HTMLentities ( such as ü ) within your SQL query results into their UTF8 representation (such as ü). You can choose between "no conversion at all", "only HTML entities" and "HTML entities AND UNICODES".
Workbooks configuration
Document format
This allows you to define the global document format for workbooks (e.g. if GLOBAL is selected for a specific workbook).
Document icon
Use document icon depending on the document's format (default) or the document's ID. To make use of the second possibility, you need to upload your desired workbook icon into the images folder on [JOOMLAROOT]/media/com_jdbexport/images. The icon needs to be 48x48px in size and PNG in format, and have a filename like wb1_icon.png (for the workbook with the id 1) or wb16_icon.png (for the workbook with the id 16).
You can see this behaviour if you turn on that switch for either of your workbooks with id 1, 2 or 16 (we provide example icons for these three ids in the media folder).
Compress workbook
You can set this to YES, if you want your workbooks to be delivered as ZIP files. This requires the ZIPARCHIVE extension being installed and activated on your webserver.
Substitute workbook parameters
Should your workbook parameters respect dynamic variables to be substituted?
Runtimeparameter modalbox CSS
This is to define the CSS file which will be used to style the runtime parameter entry box.
Default font / fontsize
These two setting define the font and fontsize, that is used for workbooks and worksheets, when you do not select any specific font and fontsize.
Formula precalculation
DBexport is able to pre-calculates all formulas in spreadsheets. This can be slow on large spreadsheets, and maybe even unwanted, therefor this option is turned off by default. You can however enable formula pre-calculation.
CR/LF handling (individual for each document format)
How should CR/LFs - that occur within the values of the resulting cells - should be treated.
CSV: Column separator
What character should be used to separate columns in the resulting CSV file (eg. comma or semicolon).
CSV: Text qualifier
What character should be used to identify text values (eg. single quote or double quote).
CSV: Text qualifier escape
If your text qualifier appears within your text values, how should they be "escaped" (eg. twice double qoute)
JSON: Include NEWLINES
When creating a JSON document, you can decide here whether to include NEWLINE characters after each KEY-VALUE (to increase human readability).
Schedules configuration
Scheduler FROM email
The email address the sheduler should use for the FROM parameter when sending emails. If you leave this empty, the JOOMLA global configuration -> Mail setting will be used.
Scheduler FROM name
The name the sheduler should use for the FROM parameter when sending emails. If you leave this empty, the JOOMLA global configuration -> Mail setting will be used.
Scheduler REPLY-TO email
The email address the sheduler should use for the REPLYTO parameter when sending emails. If you leave this empty, the JOOMLA global configuration -> Mail setting will be used.
Scheduler REPLY-TO name
The name the sheduler should use for the REPLYTO parameter when sending emails. If you leave this empty, the JOOMLA global configuration -> Mail setting will be used.
Send separate emails
A scheduler email may have multiple receipients, and some servers restrict sending emails to multiple receipients. YES will send an email to each receipient separatly.
Embed HTML workbooks
For scheduler emails that are HTML formatted, you have the choice to embed workbooks directly if they also are HTML formatted.
Test scheduled task
If set to YES, this option outputs additional information on the RUN NOW window to test and debug the scheduled task.
Timeing tolerance
...
Background processing email subject
the subject line to be used in the email sent to the user when he requests the document through the background processing feature.
Background processing email body
the message to be included in the email sent to the user when he requests the document through the background processing feature.
Advanced configuration
Replace NULL with
Microsoft Excel itself has no capability to represent NULL values from your database. Here you can define a text string that is used to represent a NULL value. You can leave this empty, if you are not interested in distinguish between an "empty" and a "NULL" value.
Method of caching
Online documentation
This option allows us to support the URL for this documentation for different versionbranches of jDBexport (we might eventually even use this for translated documentations).
Rows in preview
Formulas in preview
Extracells in preview
Show download button
Substitute in page header / footer
more to be described...
Security features
Check SQL
Enable (recommended) or disable checking the final (e.g. after substitution of variables and runtime parameters) SQL query for potentially disallowed SQL keywords.
Disallowed words
This is the list of SQL keywords that are considered "not allowed". jDBexport refers to this configuration setting, to validate any SQL query before they are executed.
Note: you could even add certain database table names here, that you wish to exclude from being queried. This could be the case, if such tables hold sensitive information. To do so, please add both variants of the table name (e.g. '#__tablename' and 'xyz_tablename', where xyz_ is to be replaced by your actual table prefix) to this list.
Show SQL errors in worksheet
When an SQL query returns an error, you can decide here whether this error message should be shown in the worksheet, or only a generic message should show up in the worksheet. This depends on whether your users should know WHAT went wrong (helpful for debugging), or will be confused by such an "technical description".
SQLite3 path to DB
...
User security
...
User security definitions
...
Access level group
...
PrepareDoc security
...
PrepareDoc use session ID
...
Permissions configuration
The options on this tab are similar to those of core components such as "articles" or "weblinks".
Please note, that only users who are granted to [Configure the component] (e.g. access the components [Options] dialog) will be able to access the [Databases] and [Schedules] pages.
Categories
jDBexport utilises to the JOOMLA standard categories. This means that all functionality of the JOOMLA standard categories (access levels, nesting, ...) are likewise available for jDBexport categories. For more details on how to deal with JOOMLA categories, please refer to the JOOMLA documentation.
Worksheets
This is the core element of the component - defining Excel (and other) worksheets. There exists a great number of possibilties here to create worksheets, most of them are thouroghly explained in the Detailed Instruction part of this manual. Here we provide you with the very essential core information.
The Worksheet definition consists of (currently) seven separate tabs, some of them having subtabs in them.
The [General] tab
Here you define the basics of the worksheet, like the worksheet title, the name that appears on the worksheet tab in Excel and a description that can be shown next to the worksheet title in the frontend.
And then there are two more elements to define: the SQL query itself and the database this query should be executed against. After installation, you only have the JOOMLA database to select from, but you can define more databases (on different servers with different database drivers) to boost your possibilities. See the database chapter below for more information about this.
The SQL query
In fact, this is the core feature of jDBexport. This field takes a valid SQL query statement, that will be executed against the database, whenever a workbook with this worksheet in it is requested (either by clicking one of the icons [Download], [Preview], [Background processing], [Google DocViewer], or if the scheduler runs a respective task. The SQL query can be as simple as this: select * from #__categories or it can be a most sophisticated dynamic SQL query with user depending or user requested variables, multiple databases on different hosts, or virtually anything you can imagine to receive from an SQL query (in fact we've seen some pretty amazing, brilliant and complex SQL queries being utilised by our customers around the world...)
There are in fact only three limits to this SQL queries:
- your needs
- your skills in handling the SQL language
- the fact that jDBexport is a data reporting instrument
The first of these limits is self explaining, so let's focus on the other two limits:
Your SQL skills
jDBexport does not (and from a current perspective will never) have a graphical interface for creating SQL queries. Although this might look like a disadvantage to beginners, we strongly belief that in fact this would limit the flexibility of the instrument in the long run. However, there are plenty of graphical SQL query generators available, from which you could copy/paste the generated SQL query into jDBexport (some of our customers are using exactly this approach). And there is lots of literature and online courses to enhance SQL skills, a good starting point is of course Wikipedia SQL Select .
jDBexport as data reporting instrument
jDBexport IS and will always be a data reporting tool. Using it to update your database is outside the scope for this instrument, we tried to explain this in our support forum. Consequently, we are actively disallowing any SQL keywords other than are directly connected with SELECTing data. However, there might be (and in fact are) situations where you need some of these SQL keywords (a common example is the SET keyword). We implemented a solution to allow these statements, but you are completely on your own in case the respective SQL statements cause any trouble in your database!
However, if you come across a certain limitation of jDBexport in it's ability to render your SQL SELECT statements, please do not hesitate to contact us and we will try to find a solution together with you...
Help subtabs (below the main SQL query)
Below the main SQL query input area, jDBexport provides you with helpful information about your query. There are (currently) four help tabs, which we describe below. To see these help tabs, you need to activate the corresponding option on the [Worksheets] tab in the components options dialog. Here you can also decide which of the four help tabs is to be shown when you open the [General] tab of the [Worksheet] view.
[SQL help] subtab
This provides you with a few helpful links to answer the most commonly occuring questions about your SQL query.
[Database tables] subtab
This is an accordeon list of all tables and their attributes of the currently selected database. Please note that you need to reopen the worksheet, if you select another database - this view is not updated dynamically!
You can investigate the names, fieldtypes and comments of all attributes of each database table.
[Syntax / Errors] subtab
This feature allows you to test your SQL query against the actual database. If there is a syntax error, it will be shown here. If the query is correct, this tab shows you the number of records that would have been returned. To use this feature, you need to activate the corresponding option on the [Worksheets] tab of the [Options] dialog.
The syntax check is performed on two possible events:
- You changed the SQL query and leave the SQL query field (pointing the cursor to some other input field)
- You actively click on the SQL check icon in this tab
Please note that, in contrast to previous versions, the syntax check is NOT performed each time you stroke a key on the keyboard.
[SQL query EXPLAIN] subtab
this is currently under development...
The [Layout] tab
Here you define the general layout of your worksheet (remember that only the workbook document format [Excel 2007] fully supports all these layout definitions. All other workbook document formats only partitially support these layout definitions.
Column heading
Show column heading
Set this to YES, if you want the column names of your SQL to be shown in the first available row.
Empty rows before
Select the number of rows that should be inserted empty before the column heading. You can address these cells with the [Extracells] feature.
Format column headings
Use this to format your column heading row with font, fontsize, style, alignments, fontcolor and background color.
Column datarows
Format column datarows
Use this to format your column datarows with font, fontsize, style, alignments, fontcolor and background color.
In addition, you can set [Alternating] backgrounds to [YES] in order to have two different background colors applied alternatingly. This feature allows you to create alternating backgrounds (known from "continuous stationery, preprinted"):
- Repeat 1 => how many datarows should have background color 1 (before switching to background color 2)
- Background 2 => select the second background color
- Repeat 2 => how many datarows should have background color 2 (before switching to background color 1 again)
Show gridlines
If set to yes, the worksheet will show thin gridlines between the cells (only if the background color is set to NONE).
Column widths
Define a list of columns with their respective widths, separated by semicolon. Each definition consists of the column letter index and the width, separated by a colon.
Example
Hide columns
Hide columns in preview
General page layout
The [Format] tab
The [Format] tab itself consists of three subtabs, [List], the [New] and the [Edit] subtab. They are used for the respective tasks.
The [List] subtab
This subtab lists all existing cell format defintions for this worksheet. It shows you the most important elements of the definition (worksheet cellrange, content type and the actual content/default value). The list also provides means to delete and edit an existing cellformat definition. To delete, click on the [Delete] icon in front of the respective cellformat definition row (you will be asked to confirm this delete action). To edit, click on the worksheet cellrange, which holds a link to the respective [Edit] subtab.
The [New] subtab
This subtab shows you an empty cellformat definition, so you can create a new one. You need to define the worksheet cellrange, the ....
Please note that you have to save this new cellformat definition with the respective button below this definition. Using the [Worksheet Save] button will not save newly defined (or edited) cellformats!
The [Edit] subtab
This subtab shows you the selected cellformat definition (only if you selected one from the [List] subtab. If you click on this tab without having selected an cellformat definition, this tab will be empty!).
The [Extra cells] tab
The Extra cells tab itself consists of three subtabs, [List], the [New] and the [Edit] subtab. They are used for the respective tasks.
The [List] subtab
This subtab lists all existing extra cell defintions for this worksheet. It shows you the most important elements of the definition (worksheet cell coordinate, content type and the actual content/default value). The list also provides means to delete and edit an existing extra cell definition. To delete, click on the [Delete] icon in front of the respective extra cell definition row (you will be asked to confirm this delete action). To edit, click on the worksheet cell coordinate, which holds a link to the respective [Edit] subtab.
The [New] subtab
This subtab shows you an empty extra cell definition, so you can create a new one. You need to define the worksheet cell, the content type and the actual content. For details on these information, please refer to the respective chapter in the Detailed instructions section further down this page. You also can define font family, size, style, alignments and color.
Please note that you have to save this new extra cell definition with the respective button below this definition. Using the [Worksheet Save] button will not save newly defined (or edited) extra cells!
The [Edit] subtab
This subtab shows you the selected extra cell definition (only if you selected one from the [List] subtab. If you click on this tab without having selected an extra cell definition, this tab will be empty!).
The [Autofilter] tab
Starting with version 3.1.5 jDBexport is capable of handling Excel Autofilters as well.
The [Autofilter] tab itself consists of three subtabs, [List], the [New] and the [Edit] subtab. They are used for the respective tasks.
The [List] subtab
This subtab lists all existing autofilter defintions for this worksheet. It shows you the most important elements of the definition (worksheet cellrange, autofilter type and ...). The list also provides means to delete and edit an existing autofilter definition. To delete, click on the [Delete] icon in front of the respective autofilter definition row (you will be asked to confirm this delete action). To edit, click on the worksheet cellrange, which holds a link to the respective [Edit] subtab.
The [New] subtab
This subtab shows you an empty autofilter definition, so you can create a new one. You need to define the worksheet cellrange, the autofilter type and .... . .
The cellrange defines the region, where the autofilter should be applied. It is defined as standard Excel cellrange, e.g. "A3:C9" . The first row of this AutoFilter cellrange will be the heading row, which displays the AutoFilter dropdown icons. This row is not part of the actual AutoFiltered data. All subsequent rows are the AutoFiltered data. So an AutoFilter cellrange should always contain the heading row and one or more data rows (one data row is pretty much meaningless for AutoFilters, but jDBexport won't actually stop you specifying a meaningless cellrange).
If you want to set the whole worksheet as an AutoFilter region, you can use a string like "ALL" as a cellrange ( actually any string that does not contain a valid cellrange as described above will trigger the "whole worksheet as an autofilter region" functionality).
Please note that you have to save this new autofilter definition with the respective button below this definition. Using the [Worksheet Save] button will not save newly defined (or edited) autofilter definitions!
The [Edit] subtab
This subtab shows you the selected autofilter definition (only if you selected one from the [List] subtab. If you click on this tab without having selected an autofilter definition, this tab will be empty!).
The [Charts] tab
Starting with version 3.2.1 jDBexport is capable of handling Excel Charts as well. This is a powerful feature, which requires a fair amount of configuration understanding. please visit the respective detailled instructions section below for more information.
The [Charts] tab itself consists of three subtabs, [List], the [New] and the [Edit] subtab. They are used for the respective tasks.
The [List] subtab
This subtab lists all existing chart defintions for this worksheet. It shows you the most important elements of the definition (worksheet title and description, chart type and the cellranges for the data). The list also provides means to delete and edit an existing chart definition. To delete, click on the [Delete] icon in front of the respective chart definition row (you will be asked to confirm this delete action). To edit, click on the worksheet cellrange, which holds a link to the respective [Edit] subtab.
The [New] subtab
This subtab shows you an empty chart definition, so you can create a new one. You need to define the worksheet cellrange, the chart type and .... . .
The [Edit] subtab
This subtab shows you the selected chart definition (only if you selected one from the [List] subtab. If you click on this tab without having selected an chart definition, this tab will be empty!).
The [Advanced] tab
Include empty worksheets
If this worksheet is empty (e.g. returns ZERO datarows), should it be included into the workbook anyway.
Message for empty worksheets
If this worksheet is empty (e.g. returns ZERO datarows), you can define an individual message to be included into this worksheet.
Restrictions
The following restrictions apply to worksheets:
- Sheetname may not be longer than 31 characters - this is a restriction by Excel (in some circumstances, Excel accepts only 30 characters.
- Sheetname may not contain any blank-spaces
- only the workbook document format [Excel 2007] fully supports all layout definitions for worksheets.
Workbooks
jDBexport workbooks hold at least one single worksheet. Workbooks are the item you can preview, download, background process or use in schedules.
The General tab
Here you define the basics of the workbook, like the workbook title, the name that is used for linking to the workbook, the physical filename the workbook should have (please note that this filename is WITHOUT extension, as the extension is determined based on the [Document fileformat] - see below), and the category the workbook is assigned to.
Document file format
This is where you define what kind of document the user will receive. You can either leave this to the global setting (from the components options dialog [Workbooks] tab), or individually define this for each workbook. Please refer to the Apendix for a detailed description of all available document formats.
Document icon
This is where you define what icon is used for the document. You can either leave this to the global setting (from the components options dialog [Workbooks] tab, or individually define this for each workbook. You (currently) have two possibilities: 1) use a document icon depending on the document file format (see above), or 2) use an individual icon depending on the workbook's ID. If you choose the later, you will have to upload your workbook icons manually to the server.
Target folder on the server is: .../SITEROOTDIR/media/com_jdbexport/images/
Fileformat is *.png
Imagesize is 48x48 pixel
Filename for each icon is "wb[WBID]_icon.png"
- (where [WBID] stands for the desired workbook's ID, eg. "wb54_icon.png" for workbook ID 54)
- Restrictions for the filename: no blank spaces, no upper cases, no leading zeros for WBIDs
The Worksheets tab
The worksheets tab provides two drag-and-drop areas, where you can define which worksheets are to be included into the workbook, and in which order. You can move a worksheet from one area to another by drag-and-drop, and order the worksheets by moving them up and down.
Note: currently, the sorting of worksheets is under revision. The easiest way to get your sorting order is by dragging the respective worksheets in your desired order to the [selected worksheets area].
the Runtime parameters tab
the Advanced tab
Here you find additonal configuration options regarding your current workbook.
Document password
Writer for XLSX
Select the writer library to be used on this workbook (PhpSpreadsheet library supports the full set of formatting and formula possibilities of Excel, but it heavily requests resources from the webserver - possibly leading to execution timeouts on large and/or complex workbooks, while the Alternative library supports almost no formatting, but outruns the former in terms of execution time).
Compress document
Compress your workbook document into a ZIP file.
Zipfile password
Define a password for protecting your ZIP file from being opened.
Note: currently PHP does not support this functionality - however there is a respective feature request for PHP 5.6 (and you could support it by voting it UP there), which eventually should implement this in PHP. Currently this input field for jDBexport is invisible (and the respective functionality is ignored).
Databases
jDBexport comes with a variaty of predefined database drivers. This allows you to simply select from an existing list of database systems and provide the individual connection information in order to access these databases.
Additional notes
Multiple databases in one SQL query
You can query data from multiple databases in a single SQL query (e.g. the worksheet's main query), provided your environment fulfills a few prerequests:
- ALL databases need to be MySQL databases
- ALL databases need to be within one single instance of MySQL server
- the database user you utilise needs to have SELECT privilege on ALL databases
If these requirements are met, you can create a SQL query like this one:
SQL query
Schedules
jDBexport comes with a powerful scheduler to automate delivery of recurring reports. Setting up this scheduler consists of two separate parts, the first of which is described here. The second part is described in the detailed instructions chapter Setting up the scheduler.
Defining scheduled tasks
Within jDBexport, you can define what should be repeatedly done, and when and how this shoud be done. This is defined in the schedules part of the component. But you do not actually EXECUTE the tasks here in the scheduler part of the component administration (this second part is described in the detailed instructions chapter Setting up the scheduler). When editing or creating a scheduled task, you see four tabs, some of them might have sub tabs in them.
General tab
Title
The title is the identification for this scheduled task.
Description
You can describe the task in this field to help you identify the correct task if there are several tasks in the list.
Date of next run
Set this date (and time) to the first instance where the scheduled task should be run. This will be updated after a successful run to the next instance according your selection of the frequency below.
Date of final run
Set this date (and time) to a value, after that the scheduled task should NOT be run anymore. Leave this field empty, if the task is to be run "until further notice".
Maximum number of runs
After how many successful runs (if this is required) should the scheduler stop to execute this task? Leave this empty if there is no such restriction.
Task
Select which kind of task should be executed.
Frequency
You have to select at which interval the scheduled task is to be executed. This is the basic interval, the Run-If rules are applied on top of this frequency to determine whether the task actually should run or not.
Scheduler security
The scheduler runs on the frontend of your website, so by default anyone knowing the URL could initiate a scheduler run. To prevent this, we use this "scheduler security" password, which has to be provided by any scheduler execution request.
Access level group
This feature allows you to hide your jDBexport workbooks from public access, and still deliver them to your recipients. It uses the JOOMLA ACL implementation. In fact with this field you can set the viewing access level, the scheduler is assigned to (most similar to assigning a usergroup - and therefore the corresponding users - to a certain viewing access level in Joomla's user manager interface).
The scheduled task will then behave as if it were a user of a usergroup granted this viewing access level. This means the scheduled task can access jDBexport categories, worksheets and workbooks that are visible only to users with the respective viewing access level.
Task tab
There are (currently) two different kind of tasks, which require different additional information (provided on these subtabs here).
This task allows you to send emails to certain users, either with or without workbooks (attached to the email or as clickable links in the body.
TO, CC, BCC
You can define the email address(es) the workbooks should be sent to. This can be a list of email addresses, separated by semicolon (;), or it can be a SQL statement that returns email addresses from the JOOMLA database (example: select email from #__users where user_id < 799 (please note that here it is - currently - not possible to select any other database than the JOOMLA database).
Subject
The subject for the email. You can use variable substitution here as well.
Format
Whether the created email should be Text-Only, or HTML formatted. If you select HTML formatted emails, you can also define (in the components options dialog on the [Schedules] tab, whether workbooks defined as HTML workbooks should be embedded into the email body or attached to email.
CSS styling of HTML emails (since version 4.0.0b)
You can use centralized CSS definitions to style your email body. In the component configuration [Schedules] tab, you find the "email body CSS" field. This field can hold a JSON array of CSS definitions, which you then can address in your email body.
Example: email body CSS field in the component configuration [Schedules] tab:
Example: email body in the Scheduler:
Body
The text that should be used as the email's body. Please note that you can use variable subsitution in the email body as well.
Note: if you select the task "Send email with Links to workbooks", you can use the variable {LINKS} to define the exact position of the list with the links to your workbooks within the body. If you don't use this variable, the list will be added at the bottom of the body text.
SQL query
When you selected "run SQL query" as task on the [General] tab, you need to define the required SQL query (and the database it should be executed against) here in this subtab. Remember that substituting variables is available here as well, however user variables and runtime parameters are not supported, as these would require a user to be present at the time of execution (which is not the case for the scheduler!).
Workbooks tab
Select (drag-and-drop) the workbooks, that should be included into the email to be delivered. Remember that the scheduled task needs access to the respective categories, workbooks and worksheets to be able to deliver them to the respective users (see [scheduler access level group] on the [General] tab).
Run-If rules tab
this feature is currently under development.
Frontend functionality
As for the frontend functionality, jDBexport provides the following possibilities, which will be described below:
- Frontend menu item to show jDBexport categories and their nested subcategories (categories view)
- Frontend menu item to show a single jDBexport category and the workbooks it contains (category view)
- Frontend preview of a single workbook and the worksheets it contains (preview view)
- Module to provide easy access to workbooks from the website's module positions (frontend module)
- Plugin to embed worksheets within any standard content of the website
- Plugin to embed a single cell from a worksheet within any standard content of the website
- Plugin to embed links to workbooks (and define CSS classes to be used for these links) in any content
The category view, the preview view and the frontend module provide the following ways to access your workbooks:
![]() Preview: this creates the document and shows a defined number of rows in a HTML table view directly on your website.
Preview: this creates the document and shows a defined number of rows in a HTML table view directly on your website.
![]() Download: this creates the document and opens a dialogbox "Open document with ... / Save document" (see image below for an example in Internet Explorer)
Download: this creates the document and opens a dialogbox "Open document with ... / Save document" (see image below for an example in Internet Explorer)
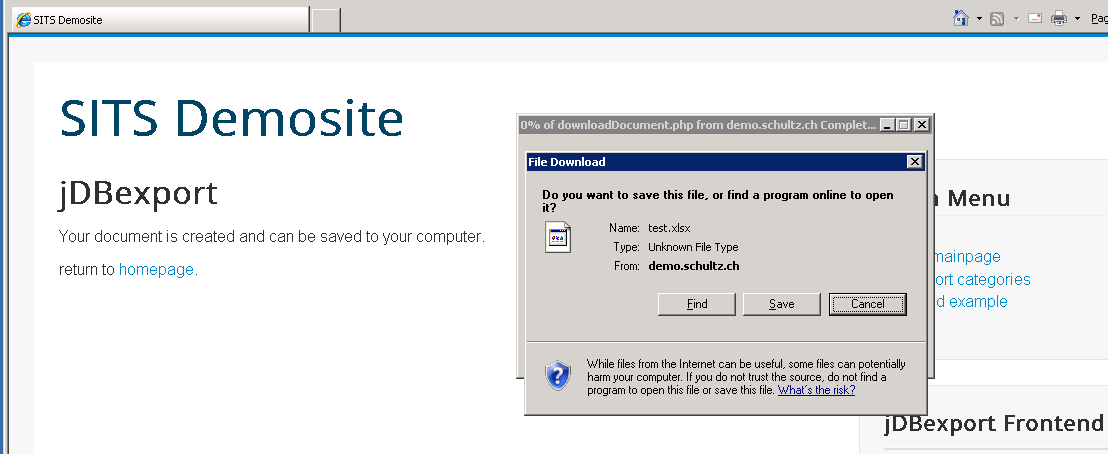
Please note, that in order to create this dialog box, we need to jump to the "jDBexport Download Page". This is a dummy page, and you can setup its content in the jDBexport component options dialog [Advanced] tab. Whatever content you define there, will be rendered on this download page. Since jDBexport 3.2.5 you can also load any Joomla module into that page, by utilising the "load module" plugin and its syntax (see this article from OSTraining for a nice description on how to do this).
![]() Create in Background: this creates the document in an independent HTTP ajax request and delivers the document by email to the logged-in user. In the meantime, the user can continue to do whatever he wants - provided he does not close the browser window.
Create in Background: this creates the document in an independent HTTP ajax request and delivers the document by email to the logged-in user. In the meantime, the user can continue to do whatever he wants - provided he does not close the browser window.
![]() Microsoft Excel Online: this creates the document and opens a Microsoft Office 365 session with the document loaded.
Microsoft Excel Online: this creates the document and opens a Microsoft Office 365 session with the document loaded.
For a detailed description of all these access methods, please see the respective chapter below...
Menu item "show (nested) categories
This menu item shows a treeview of (accessible) jDBexport categories, starting from a top level category that is defined in the menue items required settings.
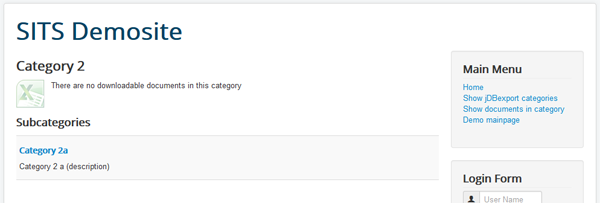
Menu item "show documents in a category"
This menu item shows a table of (accessible) documents within a jDBexport category that is defined in the menue items required settings. Please note that only workbooks accessible to the current user (based on his usergroup and access-viewlevels) are displayed here in the module.

This view allows you to (depending on your access rights, the settings in the menu item and global options [Category] tab) to handle workbooks by means of download, preview, background process or view in GoogleDocViewer.
Preview of a workbook
If the "show preview" option is set to YES (either in the component's global options dialog or the "show documents" view), you can show the workbook and it's worksheets directly on the website (without downloading it).
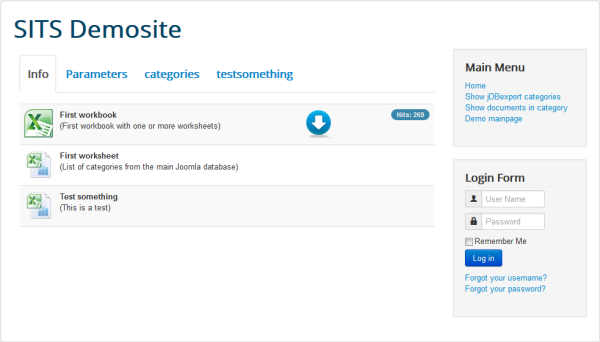
The preview consists of at least two tabs.
- On the tab [Info] you find general information about the workbook and the worksheets it contains. it also contains the [Download] and [Background processing] buttons.This tab is always available.
- On the tab [Parameters] you find an entry form to update your workbook runtime parameters and reload the worksheets with these parameters. This tab is only available, if the workbook has visible runtime parameters defined.
- On the following tab(s) the worksheets are shown. Each tab contains a worksheet and is named after the worksheet's name.
If you have defined workbook runtime parameters, the worksheets are initially created using the default value for these workbook runtime parameters. In the case of selectlists (either singleselect or multiselect, either from a list of values or from a SQL query generating such a list of values), the first value is taken as default value.
On the parameters tab, you can enter current parameters and [Reload] the workbook with these parameters.
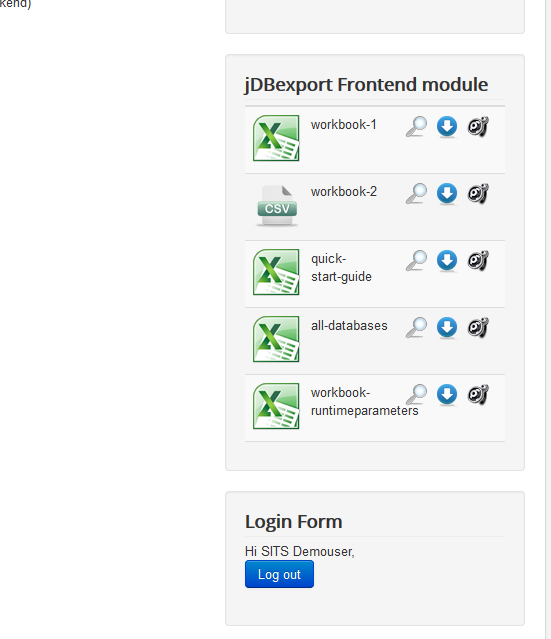
Frontend module
The frontend module provides an easy access to workbooks (download and preview) in the frontend. Please note that only workbooks accessible to the current user (based on his usergroup and access-viewlevels) are displayed here in the module.
Datagrid plugin
The datagrid plugin allows you to include a worksheet into any kind of Joomla content (and restrict the number of displayed rows in the plugin's configuration in the backend).
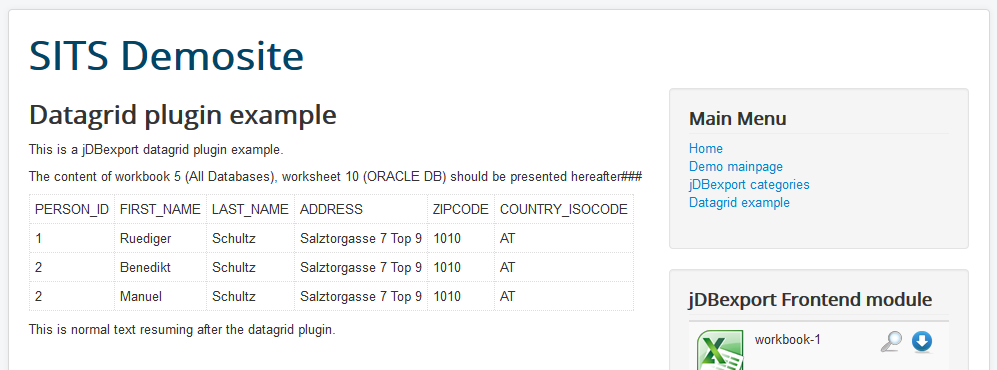
After you made sure the plugin is activated (in the Joomla administration backend), you can include a workbook/worksheet definition into any article by using the following identification string (that will be replaced by the actual worksheet):
Datagrid syntax
where WBID is the id of the workbook and WSID is the id of the worksheet. An example would be {jdbexportgrid}8:5{/jdbexportgrid} referencing the workbook ID 8 and the worksheet ID 5.
Styling for the datagrid plugin
The datagrid plugin does not consider any formatting you made in the worksheet definitions. It renders a simple HTML table of the workbook/worksheet into your content. You can, however, style the appearance of the datagrid. To control the respective CSS style definitions, you need to
- create a copy of our jDBexport css file (which resides at "/[JoomlaRootDirectory]/media/com_jdbexport/css/jdbexport.default.css" ), naming it to something like "jdbexport.mystyles.css"
- Change the datagrid stylings (you find them at "Component DATAGRID PLUGIN : layout styles") to your requirements. Especially you want to look at those stylings for the "datacells"
- Store this new stylesheet file in the same directory as the "jdbexport.default.css" file
- in jDBexport, open the Component Options dialog [Categories] tab, and change the "Category view CSS" field content from "default" to "mystyles" (or whatever you named your individual CSS file).
Note: Please don't change the original "jdbexport.default.css" file, as it will be overwritten with any subsequent jDBexport updates.
Datafield plugin
The datafield plugin allows you to include a single cell from a worksheet into any kind of Joomla content.
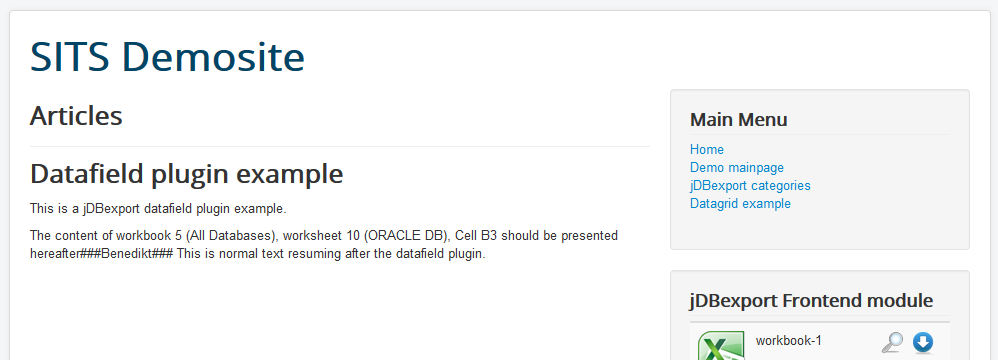
Datafield syntax
where WBID is the id of the workbook, WSID is the id of the worksheet and CELL is the coordinate of the cell. An example would be {jdbexportfield}8:5:C9{/jdbexportfield} referencing the workbook ID 8 and the worksheet ID 5, and in that worksheet the cell C9 .
Workbook-link plugin
The workbook-link plugin allows you to embed direct links to any workbook and style these links according to your template
workbook-link syntax
where
- WORKBOOK_ID is the ID of the workbook
- LINK_TEXT is the text shown with the link
- LINK_TARGET is the target window for the link
possible values are:
- "newtab" (a new browser tab - without template)
- "newtabwt" (a new browser tab - with template)
- "inline" (same browser tab - without template)
- "inlinewt" (same browser tab - with template)
- LINK_CSSCLASS is the name(s) of CSS class(es) to be applied to the link
- TASK is the jDBexport task to be performed, when the link is activated
An example would be {jdbexportwblink}33:open tickets from last week:newtabwt:bd-linkbutton-2 bd-button-13 bd-icon-24:download{/jdbexportwblink} referencing the workbook ID 33, with the linktext "open tickets from last week", applied the "bd-linkbutton-2 bd-button-13" classes, and perform "download" in new browsertab.
For LINK_TARGET, LINK_CSSCLASS and TASK, you can also use GLOBAL to refer to the globally set values in the plugin's backend configuration.
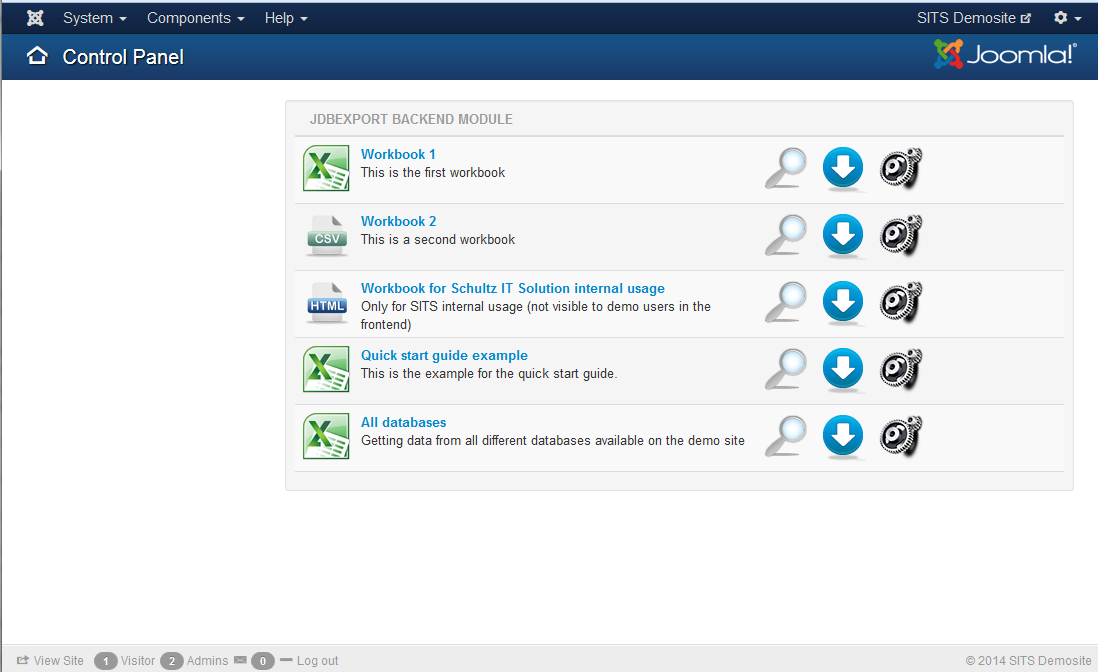
Backend module
The backend module is similar to the frontend modul - we describe it here, as we consider this the most logical location in the user manual (although it is not a "frontend" functionality).
The backend module provides an easy access to workbooks (download and preview) in the controlpanel (main page) of the backend administration. Please note that ALL workbooks are displayed here in the module, regardless of the users usergroup and viewing accesslevel.
Preview, Download, Background processing, Microsoft Excel Online
jDBexport allows your users to receive the documents on different channels, each of which has different advantages and disadvantages. Let us compare these channels here in brief.
The Preview button
![]() This functionality is ment to "preview" a document / worksheets - it allows to show a limited number of records, change runtime parameters (if available) and perform the other channel functions (download, background processing and Google DocViewer). The preview is a HTML representation of your document, so not all functionality known from Excel is available here. However, this is more flexible than for example the datagrid plugin, as it allows you to show several worksheets and use navigation tabs to switch between them.
This functionality is ment to "preview" a document / worksheets - it allows to show a limited number of records, change runtime parameters (if available) and perform the other channel functions (download, background processing and Google DocViewer). The preview is a HTML representation of your document, so not all functionality known from Excel is available here. However, this is more flexible than for example the datagrid plugin, as it allows you to show several worksheets and use navigation tabs to switch between them.
The Download button
![]() This functionality opens the document with a "Save as..." window, that allows your users to store the document on their computer. This is the main functionality, however on larger workbooks, this may take considerable resources on the server (time and memory) and eventually exceed available resources (where the creation process is killed by the webserver).
This functionality opens the document with a "Save as..." window, that allows your users to store the document on their computer. This is the main functionality, however on larger workbooks, this may take considerable resources on the server (time and memory) and eventually exceed available resources (where the creation process is killed by the webserver).
Starting with version 3.2.8, jDBexport offers a progressbar while the document is created. The estimated creation time is calculated based on previous downloads of this specific workbook.
The Background processing button
![]() This functionality queus the requested document in a separate server session (ajax request) with larger amounts of resources granted and, after successful creation of the document, eventually delivers it by email to your user. Consequently this functionality requires your user to be logged in (otherwise the system does not know which email address the document should be sent to). The main advantage is, when using this on complex workbooks, that the user can continue to work with the website and is not required "to wait for the document" (provided he keeps the webbrowser open).
This functionality queus the requested document in a separate server session (ajax request) with larger amounts of resources granted and, after successful creation of the document, eventually delivers it by email to your user. Consequently this functionality requires your user to be logged in (otherwise the system does not know which email address the document should be sent to). The main advantage is, when using this on complex workbooks, that the user can continue to work with the website and is not required "to wait for the document" (provided he keeps the webbrowser open).
The Microsoft Excel Online button (available with jDBexport 4.0.0a)
![]() This functionality creates a link to Microsoft's cloud application "Excel Online", where this application is called with the link to the beforehand created document. For more information about these Microsoft cloud solutions, visit this "Beginner's Guide" by Matthew Guay. As the Google DocViewer is looking increasingly archaic, we felt we need to upgrade this feature to a more current look-and-feel. But please note that this feature is only available for Microsoft Excel documents (*.xlsx and *.xls). For all other types of documents you can create with jDBexport, this functionality is deactivated.
This functionality creates a link to Microsoft's cloud application "Excel Online", where this application is called with the link to the beforehand created document. For more information about these Microsoft cloud solutions, visit this "Beginner's Guide" by Matthew Guay. As the Google DocViewer is looking increasingly archaic, we felt we need to upgrade this feature to a more current look-and-feel. But please note that this feature is only available for Microsoft Excel documents (*.xlsx and *.xls). For all other types of documents you can create with jDBexport, this functionality is deactivated.
 To use this service your document has to be publically accessible (as Microsoft Excel Online is actually the one who is requesting the document, and Microsoft Excel Online cannot "login to your website"). Also if your document is behind any kind of password protection (e.g. a directory protection like .htaccess on Apache Webserver), Microsoft Excel Online will not be able to access your document and show an error message.
Starting with version 3.2.8, jDBexport offers a progressbar while the document is created. The estimated creation time is calculated based on previous downloads of this specific workbook.
Delivering your workbooks automatically by means of our scheduler
This functionality is described below in great detail.
Prepare the document for further processing (without downloading it)
This (new in version 3.2.2) functionality allows you to "only create" the document, without actually "downloading" or "previewing" it. This is useful, if you need to deal with the document in other processes or programs. To use this, your process or program needs to call frontend task by an URL of the following form:
HTTP://www.YourWebsite.com/index.php?option=com_jdbexport&task=prepareDocument&id=YOURDOCUMENTID&key=YOURDOCUMENTSECURITY&tmpl=component
where YOURDOCUMENTID refers to the ID of the requested document
where YOURDOCUMENTSECURITY refers to the prepare document security "password" you provided in the jDBexport component options dialog [Advanced] tab.
Configuration options for this functionality
In order to make use of this functionality, you need to provide three pieces of information in the jDBexport component options dialog [Advanced] tab:
- prepareDocumentAccess level group: This feature allows you to hide your jDBexport workbooks from public access, and still use the prepareDocument functionality. It uses the JOOMLA ACL implementation. In fact with this field you can set the viewing access level, the prepareDocument is assigned to (most similar to assigning a usergroup - and therefore the corresponding users - to a certain viewing access level in Joomla's user manager interface).
The prepareDocument task will then behave as if it were a user of a usergroup granted this viewing access level. This means the prepareDocument task can access jDBexport categories, worksheets and workbooks that are visible only to users with the respective viewing access level.
- prepareDocument security: The prepareDocument function runs on the frontend of your website, so by default anyone knowing the URL could initiate this functionality. To prevent this, we use this "prepareDocument security" password, which has to be provided by any calling request in the form of an URL parameter: &key=YOURDOCUMENTSECURITY
This URL parameter will be compared to the value in this configuration option before any request is executed. - use SESSION ID for filename: by default, documents generated with jDBexport always have the JOOMLA session ID as part of the filename. For the prepareDocument functionality, you can "deactivate" this behaviour, resulting in a fixed filename, which your own programs can easyly process.
please note, that if you deactivate the usage of the session id in the generated documents filename, this could lead to information disclosure (as anybody could actually access the generated document, if he "knows" the filename. So please use this feature only for "non-sensitive" documents!
When you have setup these configuration options, all you need is to initiate the functionality by calling the above described URL.
Please note, that you have to call the frontend task FOR EACH requested document individually.
DETAILED INSTRUCTIONS
Advanced configuration possibilities
Starting with the version 3.1.0 jDBexport offers some new and advanced possibilities to configure. These features of the component options dialog are described in detail here.
Categories options - Category view CSS
In this text field, you can name a stylesheet to be used for the frontend views. If for example, you want to layout the frontend views according to your overall website template, you might change the "default" in this field to something like "yourtemplatename".
Now you need to copy the jdbexport.default.css file in the component's media folder ("httpdocs/media/com_jdbexport/css/jdbexport.default.css") to a new file "httpdocs/media/com_jdbexport/css/jdbexport.yourtemplatename.css" and edit this new file to your likings. For detailed information about the possibilities for editing please refer to the respective comments within the stylesheet file itself.
Workbook options - Runtime parameter view CSS
In this text field, you can name a stylesheet to be used for the frontend runtimeparameter modalbox. If for example, you want to layout the frontend runtimeparameter modalbox according to your overall website template, you might change the "default" in this field to something like "yourtemplatename".
Now you need to copy the jdbexport.default.css file in the component's media folder ("httpdocs/media/com_jdbexport/css/jdbexport.default.css") to a new file "httpdocs/media/com_jdbexport/css/jdbexport.yourtemplatename.css" and edit this new file to your likings. For detailed information about the possibilities for editing please refer to the respective comments within the stylesheet file itself.
Worksheets options - Color palette
In this text field, you can name a color palette to be used for the worksheets. If for example, you want to use only Excel 2003 colors, you might change the "excel2007" in this field to "excel2003". Both of these color palettes are provided by default. If you wish to use your own set of colors, you might change this field to something like "mycolorpalette".
As a starting point, we provide three color palettes for you to choose from (or to use as a template for your own color palette)
- "excel2007" (with the color selection as it is used since Excel 2007)
- "excel2003" (with the color selection as they were used in Excel 2003 and before)
- "eighties-retro" (with a reduced color selection of 16 colors, for those of you who value history)
Now you need to copy the default color palette file colorpalette.excel2007.php in the component's media folder ("httpdocs/media/com_jdbexport/assets/colorpalette.excel2007.php") to a new file "httpdocs/media/com_jdbexport/assets/colorpalette.mycolorpalette.php" and edit this new file to your likings.
Please note that the file contains a two dimensional PHP array representing the color picker. The default color palette (excel2007) consists of EIGHT rows, the first of which has ONE column, the rest each with TEN columns. Each cell of this matrix (addressed by a simple index) contains the hex code for a color (e.g. #000000 for BLACK and #ffffff for WHITE).
The cell in the FIRST row represents NO-COLOR (the default value). For your conveinience we did set this color to #ECECEC, which is identical to the color-picker's background color. But if you changed the respective layout CSS to use another background color, you should set this default color accordingly.
You can define as many rows and columns as you need, however if you define more than ten or eleven columns for each row, you might run into layout issues with the color picker.
Variable substitution
With jDBexport, you can use substitution variables in the document's filename, worksheet name, header, footer and also in the SQL queries to create dynamic reports. These variables get substituted with the current value when the workbook is created (e.g. when the user clicks to download the workbook). Please consult the list of available variables below for details.
Note: to use variable substitution, please make sure that the corresponding options in the [OPTIONS] -> [Worksheets] dialog are set to YES.
List of available substitution variables
User variables
| Variable name | Description | Example (see demo site) |
|---|---|---|
| {USER_ID} | The user id, as in $user->id (0 when user not is logged in) | 819 |
| {USER_USERNAME} | The username, as in $user->username | SITS.Demouser |
| {USER_NAME} | The name, as in $user->name | Demo User |
| {USER_EMAIL} | The email address, as in $user->email | This email address is being protected from spambots. You need JavaScript enabled to view it. |
| {USER_IP} | The IP Adress the user is calling your website from, $_SERVER['REMOTE_ADDR'] | 192.168.11.242 |
Server variables
| Variable name | Description | Example (see demo site) |
|---|---|---|
| {SERVER_URL} | The Server root URL, JURI::root() | http://it-solutions.schultz.ch |
| {SERVER_HOST} | The Server hostname, $_SERVER['HTTP_HOST'] | demo.schultz.ch |
| {SERVER_IP} | The IP address of the server, $_SERVER['SERVER_ADDR'] | 192.168.1.17 |
| {QUERY_STRING} | The Server software, $_SERVER['SERVER_SOFTWARE'] | option=com_jdbexport&task=download&id=1 |
HTTP GET variables
| Variable name | Description | Example (see demo site) |
|---|---|---|
| {jdbexportparam01} | Use this, if you need special values in your query - and add it to the calling URL | ABCDEF |
| {jdbexportparam02} | Use this, if you need special values in your query - and add it to the calling URL | 123456 |
| {jdbexportparam03} | Use this, if you need special values in your query - and add it to the calling URL | VDE1234 |
| {jdbexportparam04} | Use this, if you need special values in your query - and add it to the calling URL | 5588 |
| {jdbexportparam05} | Use this, if you need special values in your query - and add it to the calling URL | ACDE |
| {jdbexportparam06} | Use this, if you need special values in your query - and add it to the calling URL | 456456 |
| {jdbexportparam07} | Use this, if you need special values in your query - and add it to the calling URL | 8888 |
| {jdbexportparam08} | Use this, if you need special values in your query - and add it to the calling URL | anotherParameter |
| {jdbexportparam09} | Use this, if you need special values in your query - and add it to the calling URL | 111444555 |
The calling URL would then look something like:
http://demo.schultz.ch/j3.x/index.php?option=com_jdbexport&task=download&id=2&jdbexportparam01=ABCDEF&jdbexportparam02=123456
Other variables
| Variable name | Description | Example (see demo site) |
|---|---|---|
| {JOOMLA_VER_LONG} | JOOMLA Version name, long description | Joomla! 3.3.3 Stable [ Ember ] 25-July-2014 13:00 GMT |
| {JOOMLA_VER} | 3.3.3 | |
| {SITE_NAME} | Joomla configuration "site name" | SITS Demosite |
Date / Time variables
| Variable name | Description | Example (see demo site) |
|---|---|---|
| {d} | Day of the month, 2 digits with leading zeros | 01 to 31 |
| {m} | Numeric representation of a month, with leading zeros | 01 through 12 |
| {Y} | A full numeric representation of a year, 4 digits | Examples: 1999 or 2003 |
| {y} | A numeric representation of a year, 2 digits | Examples: 99 or 03 |
| {z} | The day of the year (starting from 0) | 0 through 365 |
| {H} | 24-hour format of an hour with leading zeros | 00 through 23 |
| {i} | Minutes with leading zeros | 00 to 59 |
| {s} | Seconds, with leading zeros | 00 through 59 |
Worksheet coordinate variables
| Variable name | Description | Example (see demo site) |
|---|---|---|
| {COLID} | The ID of the current column | |
| {COLIDM1} (see note 1 below) | The ID of the column left to the current column | |
| {COLIDM2} (see note 1 below) | The ID of the column second left to the current column | |
| {COLIDM3} (see note 1 below) | The ID of the column third left to the current column | |
| {COLIDP1} (see note 1 below) | The ID of the column right to the current column | |
| {COLIDP2} (see note 1 below) | The ID of the column second right to the current column | |
| {COLIDP3} (see note 1 below) | The ID of the column third right to the current column | |
| {MINCOLID} | The ID of the first data column | |
| {MAXCOLID} | The ID of the last data column | |
| {MAXCOLIDP1} | The ID of first column after the last data column | |
| {MAXCOLIDP2} | The ID of the second column after the last data column | |
| {MAXCOLIDP3} | The ID of the third row after the current data row | |
| {MAXCOLIDP4} | ||
| {MAXCOLIDP5} | ||
| {MAXCOLIDP6} | ||
| {MAXCOLIDP7} | ||
| {MAXCOLIDP8} | ||
| {MAXCOLIDP9} | ||
| {ROWID} | The ID of the current row | |
| {ROWIDM1} | The ID of the previous row | |
| {ROWIDM2} | The ID of the second previous row | |
| {ROWIDM3} | The ID of the third previous row | |
| {ROWIDP1} (see note 1 below) | The ID of the first row after the current data row | |
| {ROWIDP2} (see note 1 below) | The ID of the second row after the current data row | |
| {ROWIDP3} (see note 1 below) | The ID of the third row after the current data row | |
| {MINROWID} | The ID of the first data row | |
| {MINROWIDM1} | The ID of first row before the first data row | |
| {MINROWIDM2} | The ID of second row before the first data row | |
| {MINROWIDM3} | The ID of third row before the first data row | |
| {MAXROWID} | The ID of the last data row | |
| {MAXROWIDP1} | The ID of the first row after the last data row | |
| {MAXROWIDP2} | The ID of the second row after the last data row | |
| {MAXROWIDP3} | The ID of the third row after the last data row | |
| {MAXROWIDP4} | The ID of the fourth row after the last data row | |
| {MAXROWIDP5} | The ID of the fifth row after the last data row | |
| {MAXROWIDP6} | The ID of the sixth row after the last data row | |
| {MAXROWIDP7} | The ID of the seventh row after the last data row | |
| {MAXROWIDP8} | The ID of the eight row after the last data row | |
| {MAXROWIDP9} | The ID of the nineth row after the last data row | |
| {COLHEADINGSROWID} | The ID of the row with the column headings | |
Special usage variables
| Variable name | Description | Example (see demo site) |
|---|---|---|
| {PH_CRLF} | Print-Header/Footer Special code: CarriageReturnLineFeed (e.g. new line) | create a newLine in the Print-Header/Print-Footer areas |
Note 1: These worksheet coordinate substitution variables are only available, if you activate the respective option in the [Advanced] tab of the worksheet definition (there is also an underlying global configuration setting, which we recommend to be left to "No"). These variables need to be calculated for each and every cell in your worksheet. So this may increase execution time to create the worksheet.
If for certain reasons, you need other variables, please do not hesitate to contact us, usually the implementation of such variables is a trivial task.
Formulas in queries
jDBexport allows to use Excel formulas in your SQL queries. Create the formula as a text field in your SQL statement:
You can also use the worksheet coordinate variables {ROWID} and {COLID} to create dynamic formulas depending on the coordinate.
Please note that you have to
- use the english function names
- use PERIOD (.) as a decimal separator
- use COMMA (,) as a function argument separator
- use SEMICOLON (;) as a matrix row separator
in your SQL queries. Excel itself will then take care of the translation into local versions when the user opens the worksheet.
Not every single Excel formula function is implemented in the underlying PHP library. If you need advanced Excel functions or additional information on individual Excel formula functions and their implementation, please refer to the relevant PhpSpreadsheet documentation or the relevant PHPExcel function documentation. This document describes how to handle Excel functions in PHPExcel library. However, most of that handling is done by jDBexport for you, so you only have to understand how to set the respective values in your cells. Just look at the examples and understand the respective setCellValue function (see page 29 for this example):
If you are unsure about the english name of a certain Excel function, you might find the solution on this brilliant website: http://excel-translator.de/
Setting up the print header and footer of a worksheet
jDBexport allows to define print headers and footers for a worksheet. These headers and footers will show up on each printed page. You can use jDBexport's own substitution variables (see variable substitution) and you can use Excel formatting codes (see table below).
By default the header or footer is printed on each page. However you can define different headers or footers for ODD and EVEN pages. To do so, jDBexport uses {ODD} and {EVEN} tags. You can define the ODD header by embracing the header with {ODD} and {/ODD} tags or the EVEN header with {EVEN} and {/EVEN} tags.
The following codes are supported by Excel2007 format and can be integrated into the page header and/or footer texts:
|
&L |
Code for "left section" (there are three header / footer locations, "left", "center", and "right"). When two or more occurrences of this section marker exist, the contents from all markers are concatenated, in the order of appearance, and placed into the left section. |
|
&P |
Code for "current page #" |
|
&N |
Code for "total pages" |
|
&font size |
Code for "text font size", where font size is a font size in points. |
|
&K |
Code for "text font color"
» RGB Color is specified as RRGGBB » Theme Color is specifed as TTSNN where TT is the theme color Id, S is either "+" or "-" of the tint/shade value, NN is the tint/shade value. |
|
&S |
Code for "text strikethrough" on / off |
|
&X |
Code for "text super script" on / off |
|
&Y |
Code for "text subscript" on / off |
|
&C |
Code for "center section". When two or more occurrences of this section marker exist, the contents from all markers are concatenated, in the order of appearance, and placed into the center section. |
|
&D |
Code for "date" |
|
&T |
Code for "time" |
|
&G |
Code for "picture as background" Please make sure to add the image to the header/footer: |
|
&U |
Code for "text single underline" |
|
&E |
Code for "double underline" |
|
&R |
Code for "right section". When two or more occurrences of this section marker exist, the contents from all markers are concatenated, in the order of appearance, and placed into the right section. |
|
&Z |
Code for "this workbook's file path" |
|
&F |
Code for "this workbook's file name" |
|
&A |
Code for "sheet tab name" |
|
&+ |
Code for add to page # |
|
&- |
Code for subtract from page # |
|
&"font name,font type" |
Code for "text font name" and "text font type", where font name and font type are strings specifying the name and type of the font, separated by a comma. When a hyphen appears in font name, it means "none specified". Both of font name and font type can be localized values. |
|
&"-,Bold" |
Code for "bold font style" |
|
&B |
Code for "bold font style" |
|
&"-,Regular" |
Code for "regular font style" |
|
&"-,Italic" |
Code for "italic font style" |
|
&I |
Code for "italic font style" |
|
&"-,Bold Italic" |
Code for "bold italic font style" |
|
&O |
Code for "outline style" |
|
&H |
Code for "shadow style" |
The above table of codes may seem overwhelming first time you are trying to figure out how to write some header or footer. Luckily, there is an easier way. Let Microsoft Office Excel do the work for you.
For example, create in Microsoft Office Excel an xlsx file where you insert the header and footer as desired using the programs own interface. Save file as test.xlsx . Now rename test.xlsx to test.zip, unzip it, and inspect directly the contents of the relevant xl/worksheets/sheetX.xml to find the codes for header/footer.
You can also use jDBexport substitution variables in the printheaders and printfooters, there is even a number of special variables for this.
Defining additional cell formats
jDBexport allows to define the general layout of your worksheet on the [Layout] tab of the worksheet view. On top of this general layout, you can define cell ranges with different layouts. These additional formats are applied sequentially ...
Number and date formats
Excel allows to display numbers and dates in various formats (e.g. with or without sign and currency symbol or leading zeros). jDBexport also incorporates this functionality in the number format field. You can use the same format codes as in Excel itself.
for example:
the default is:
This is the place where you can define the general cell format, as it is being used in Microsoft Excel on the "Format Cells" dialog box:
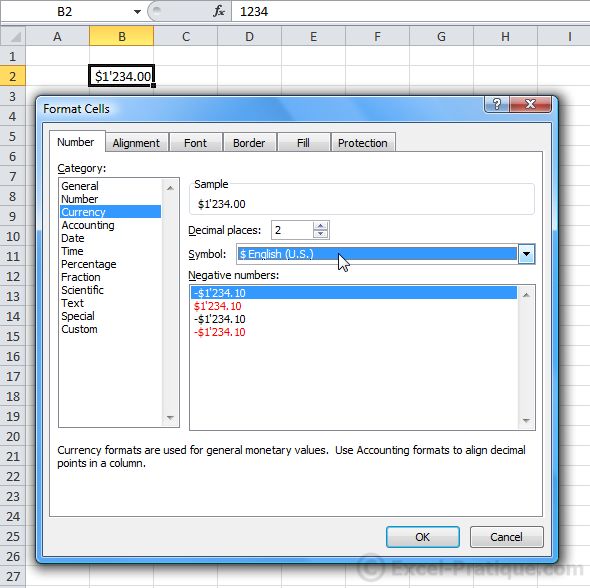
Cellformats and their representation
| Cellformat | Definition to be used | Remarks |
|---|---|---|
| General | leave the field empty | |
| Number | #0 or #000 or #0.00 | |
| Currency | ||
| Accounting | ||
| Date | ||
| Time | ||
| Percentage | ||
| Fraction | ||
| Scientific | ||
| Text | @ | |
| Special | ||
| Custom | ||
The full varity of possible formats in all detail is described on Microsoft's own OFFICE website, which we reference here.
Defining extra cells in worksheets
jDBexport allows to create individual cells independently from your main SQL query. You can use this feature to add additional header information or company logos, as well as add summarizing cells after the data.
Worksheet cell
This is the definition WHERE your content shall appear in the resulting worksheet. Please define the extra cell by it's Excel coordinates (e.g. 'B4' or 'AF12'). You can even use worksheet cell coordinate substitution variables in this cell definition to reach "relative" positions in your worksheet.
- (first colum and third row)
- (32nd colum and 61st row)
- (13th colum and last data row)
- (first colum right of the last data column and third row after the last data row)
Extracell content type
Extra cells can have a variety of contents.
Text
This content type allows you to include any text string you wish, it also utilises the variable substitution as described elsewhere in this manual. However you might wish to be careful using quotes in this text string, as they might cause unexpected results.
Formula
In additon to simple text strings, you can also use Excel formulas...
Image
To include an image (logo) into your reports, select this content type and add the path to the image into the [content] field. The path needs a leading slash and starts from your JOOMLA root directory.
for example:
SQL query
If you use this content type, you can define any valid SQL query which returns a single value to the extra cell (e.g. current date and time - concatenated).
Content
This field contains the value for the extra cell (either some text, some formula, the path to your image or an SQL query).
Database
This selection is (as you might imagine) only relevant if your selected content type is SQL query and the content contains a valid SQL query.
Extra cells BEFORE the main query
To adress extra cells before the main query (e.g. to define addtional header cells with logos or other data), you first need to "make room" for these cells. Please open the [Layout] tab of the worksheet view and select the desired number of [empty rows before]. This will create the corresponding number of empty rows before the query is generated. This way you can address these cells by their coordinates.
Defining autofilters in worksheets
jDBexport allows to create ...
Worksheet cellrange
Defining embedded charts in worksheets
Starting with version 3.2.1, jDBexport allows to create embedded charts from your worksheet data directly in the worksheet.
Chart position
This defines the area, where and how big the chart should be placed. Use a standard Excel cellrange definition (e.g. something like A7:M23 ) for this setting, this example meaning the chart will be positioned having the upper left corner at A7 and the lower right corner in M23 (giving it 13 columns width and and 13 rows height).
X axis label
This is the text string that should appear next to the X axis
X axis cellrange
This is the definition of the X axis, you can use a standard Excel cellrange definition, together with jDBexport substitution variables (e.g. something like A{MINROWID}:A{MAXROWID} , which would define the X axis from the first datarow to the last datarow of column A).
Y axis label
This is the text string that should appear below the Y axis
Y axis cellrange
Datacellranges labels
This defines the labes for dataranges (this must correspond to the datacellranges definition below), e.g. B1;C1;D1
Datacellranges
This is the core definition, which cells should be used to create the data. In our example (see the chart-example in our demo site) we define THREE datacellranges (and accordingly three datacellrange labels): B{MINROWID}:B{MAXROWID};C{MINROWID}:C{MAXROWID};D{MINROWID}:D{MAXROWID}; which means columns B and C and D - from first datarow to last datarow - represent our data we want to show in the chart.
Position of legend
This setting allows you to define "where" the legend should be positioned on the chart.
Chart type
jDBexport offers a restricted set of charttypes (e.g. not all types and variants available in Microsoft Excel can be created with jDBexport). Some of the chart types also have a 3D variant.
We here cannot describe all MS Excel chart types and their possibilities (that would fill a decent book I belief). However, you can get some ideas in this excellent tutorial on Excel charts.
Chart grouping
This allows you to cluster or stack your charts.
Hint: if you fail to save your new charts, please verify that the respective table attribute [charts] is existing in your #__jdbexport_worksheets table in the database. If not, please manually submit the following SQL statement (in phpMyAdmin):
ALTER TABLE `#__jdbexport_worksheets` ADD COLUMN `charts` text NOT NULL COMMENT 'embedded datacharts definitions' AFTER `autofilter`;
(where #__ is replaced by your actual table prefix in the database).
Defining runparameters for workbooks
In jDBexport you can define a variaty of parameters to be requested from the user before the workbook is created. You can address these parameters the same way you would address any other substitution variable in your worksheets. For example, if you create a runtime parameter PARAMETER1 (of the type STRING) for your workbook, you could use that string in your SQL query as a WHERE clause like this example:
Parameter in SQL query
Please note, that your SQL query needs to be of correct syntax. So STRING and DATE parameters need to be encapsulated by single quotes, INTEGER and FLOATING-POINT parameters not. MULTISELECT parameters will be interpreted as part of an SQL query IN clause, expecting encapsulating ().
String
This string (either the default or the string the user enters in the form) will be used as subsitute for the parameters name.
Integer
Floating point number
A floating point number parameter needs a DOT as decimal delimiter (regardless of your local settings).
Date
A date parameter allows you to pick a date from a calender popup. Currently only the date format YYYY-mm-dd is supported (we are working on a global solution to use a wider range of date formatting possibilities).
You can define a fixed default value for a date parameter, however more often you will want to have the default variable depending on some rules. To achieve this, you can make use of the facts that
- the initial values of parameters are evaluated sequentially meaning that parameter 1 is evaluated BEFORE parameter 2, and so on), and
- only those parameters are shown to the user, which are set to VISIBLE (the first radio button attribute of each parameter).
So what you have to do is to create an additional parameter (BEFORE the actual DATE parameter!) that delivers the value you want to use to prepopulate your date parameter...
- create a new parameter and name it something like INVISIBLE1 , the parameter type is [SQL - single value] and the visibility (first radio button) is set to NO
- In the [Default value] field, you enter the SQL query that will return a single value with your desired date (for details on this SQL query, see SQL - single value description below).
- create another parameter and name it something like MYDATE , the parameter type is [DATE] and the visibility is set to YES
- in the [Default value] field, you enter the name of the above parameter (don't forget the brackets!), something like {INVISIBLE1} .
- that's all you have to do - oh well, don't forget to set the respective option to YES in the components [Options] dialog on the [Workbook] tab.
SQL queries for date handling
SQL queries for date handling can be tricky, we give you a few hints here to get you started.
Get the current date, formatted to YYYY-mm-dd
Get the date one year before today
Get the date three months into the future
Please refer to the Date and Time functions in the MySQL documentation to find more possibilities
Datepicker localisation
The calendar tool for the datepicker is capable of language localisation, based on the language your Joomla website is currently using. However we did not include all available languages, but it is easy for you to add your specific language to be used.
- open the Jquery UI Github repository at: https://github.com/jquery/jquery-ui/tree/main/ui/i18n
- download your required language file, eg. "datepicker-en-GB.js"
- rename the downloaded file by replacing the "datepicker-" part with "jqueryui.datepicker.regional."
example: "datepicker-en-GB.js" becomes "jqueryui.datepicker.regional.en-GB.js"
example: "datepicker-de.js" becomes "jqueryui.datepicker.regional.de.js" - upload the renamed file to your website to
[JOOMLAROOT]/media/com_jdbexport/js/
That is all, your datepicker should now show up in the same language as the rest of your website.
Note if your country specific language file is not available on Github, e.g. "datepicker-en-US.js", then simply use the generic language file, e.g. "datepicker-en.js"
Datetime
A datetime parameter allows you to pick a date from a calender popup and use a slider to pick the time. Currently only the date format YYYY-mm-dd HH:mm:ss is supported (we are working on a global solution to use a wider range of date formatting possibilities).
You can define a fixed default value for a datetime parameter, however more often you will want to have the default variable depending on some rules. To achieve this, you can make use of the facts that
- the initial values of parameters are evaluated sequentially meaning that parameter 1 is evaluated BEFORE parameter 2, and so on), and
- only those parameters are shown to the user, which are set to VISIBLE (the first radio button attribute of each parameter).
So what you have to do is to create an additional parameter (BEFORE the actual DATETIME parameter!) that delivers the value you want to use to prepopulate your datetime parameter...
- create a new parameter and name it something like INVISIBLE1 , the parameter type is [SQL - single value] and the visibility (first radio button) is set to NO
- In the [Default value] field, you enter the SQL query that will return a single value with your desired date (for details on this SQL query, see SQL - single value description below).
- create another parameter and name it something like MYDATETIME , the parameter type is [DATETIME] and the visibility is set to YES
- in the [Default value] field, you enter the name of the above parameter (don't forget the brackets!), something like {INVISIBLE1} .
- that's all you have to do - oh well, don't forget to set the respective option to YES in the components [Options] dialog on the [Workbook] tab.
Datetimepicker localisation
The calendar tool for the datetimepicker is capable of language localisation, based on the language your Joomla website is currently using. However we did not include all available languages, but it is easy for you to add your specific language to be used.
- open the Jquery UI Github repository at: https://github.com/trentrichardson/jQuery-Timepicker-Addon/tree/master/src/i18n
- download your required language file, eg. "jquery-ui-timepicker-fr.js"
- rename the downloaded file by replacing the "jquery-ui-timepicker-" part with "jqueryui.datetimepicker.regional."
example: "jquery-ui-timepicker-fr.js" becomes "jqueryui.datetimepicker.regional.fr.js"
- upload the renamed file to your website to
[JOOMLAROOT]/media/com_jdbexport/js/
That is all, your datetimepicker should now show up in the same language as the rest of your website. If the datetime part is localised, but not your datepicker part, then refer to the chapter above on how to add localisation to the calender tool.
Note if your country specific language file is not available on Github, e.g. "jquery-ui-timepicker-de-CH.js", then simply use the generic language file, e.g. "jquery-ui-timepicker-de.js"
List of values (single select)
To create a LoV, you need to enter each PARAMKEY and PARAMVALUE combination into the value field in the syntax: KEY=VALUE; you might want to put each KEY=VALUE; pair on a single line in the input field for better readabilty.
LoV example
Please note that if your VALUE is of the type STRING, you will have to enclose the subsitution variable in your worksheet with single quotes (e.g. in your SQL query you have to write:
example
SQL / List of values (single select)
To create a LoV from a SQL query, you need to return two attributes (key and value) for each row. The first one will be the describing PARAMKEY for the value, the second one will be the PARAMVALUE to be used for the the parameter in your worksheet.
LoV / SQL example
You do do not need to use the AS clause in this query, except if you are using one database field twice (without the CONCAT trick we used in the example above). However we suggest to do this anyway for clarity.
List of values (multi select)
To create a multiselect LoV, you need to enter each PARAMKEY and PARAMVALUE combination into the value field in the syntax: KEY=VALUE; you might want to put each KEY=VALUE; pair on a single line in the input field for better readabilty.
LoV example
A multiselect list of values (either from a simple list or from an SQL query) will return a string with all selected options in single quotes. You can use this in a SQL WHERE IN clause:
example
SQL List of values (multi select)
To create a multiselect LoV from a SQL query, you need to return two attributes (key and value) for each row. The first one will be the describing PARAMKEY for the value, the second one will be the PARAMVALUE to be used for the the parameter in your worksheet.
LoV / SQL example
You do not need to use the AS clause in this query, except if you are using one database field twice (without the CONCAT trick we used in the example above). However we suggest to do this anyway for clarity.
A multiselect list of values (either from a simple list or from an SQL query) will return a string with all selected options in single quotes. You can use this in a SQL WHERE IN clause:
worksheet usage example
SQL / single value
To use a single value from a SQL query, you can define this type of parameter. This is especially helpful with the (above mentionend) prepopulating of other parameters (see DATE parameter).
SQL single value example
You do do not need to use the AS clause in this query, however we suggest to do this anyway for clarity.
Runtime parameter Popup Window layout
When runtime parameters are defined, a popup window will show up before the user actually can download the document. This popup window lists all runtime parameters and allows the user to change their values.
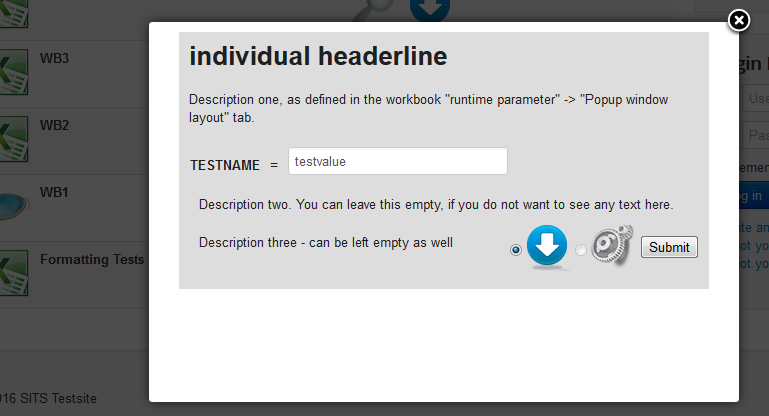
The texts for this popup window can be individually set for each workbook (on the [Popup Window layout] tab in the [runtime parameters] tab). To change the color styling of this popup window, you can use your individual CSS styles (see Advanced configuration possibilities for more details).
Defining run-if rules for schedules
The jDBexport scheduler itself is a very powerful instrument, but with the return of the "run-if rules" it just got much more flexible. Now you can not only define the basic frequency for executing your scheduler tasks (hourly, daily, weekly, monthly, yearly), but can also define additional rules to determine whether the task should run or not.
The easiest (and probably most used) example would be to have a scheduler task to run at intermediate frequencies (apart from those selectable in the frequency field), e.g. running only every second week...
To achieve this in a simple way, define a corresponding run-if rule:
- run-if definition: [Check value returned by SQL]
- SQL query: SELECT MOD( WEEKOFYEAR ( NOW ( ) ) , 2 )
- Operator: = X
- Value X: 1
Please note that in this example, the scheduled task will run in all weeks that have an ODD week-of-year number, e.g. in week 1, 3, 5, ... 49, 51, 53 - that means if a year has 53 weeks, the scheduler will run in the very last week of a year AND in the first week of the next year, which of course will result in an "out-of-sync" frequency!
Making hyperlinks active in worksheets
jDBexport allows you to create links in the worksheet that are "active" (meaning if you click on them, they actually open the target). This feature is currently available for data cells (columns and rows) and for extra cells with Text content. If you need such hyperlinks in other elements of your worksheets, please submit a respective feature request in our forum.
To use this feature, make sure you have the respective option set to YES on the worksheet tab in the components options dialog.
To allow jDBexport to recognize and handle a certain cell as a clickable one, it needs to have the respective URL as value in one of the following formats:
- http://it-solutions.schultz.ch
- https://it-solutions.schultz.ch
- sheet://'Sheetname'!A1
The first two formats allow you to create a cell, which "on click" will open a browser window with the respective URL, while the third format allows you to create a cell, which "on click" will open the respective worksheet at the respective cell (provided the worksheet is available of course).
Other formats like "=HYPERLINK('www.schultz.ch')" or "<a href='http://www.schultz.ch'>Go to Schultz.ch Website</a>" are currently NOT SUPPORTED.
Dragging, dropping and sorting elements
jDBexport allows you to drag-n-drop elements (worksheets for the workbook; workbooks for the scheduler), and also to sort them in the "...selected for this..." area.
Drag-n-drop is straight forward: simply "grab" the desired element (worksheet or workbook) in the current area it resides ("...available to select ..." or "...selected for this...") and drag it to the other area. If the element can be "dropped" in the area, the background of the area turns "green". If you drop the element without a "green" background, the element is returned to it's original location.
Sorting elements in the "... selected for this ..." area needs special considerations:
- "Sorting-upwards" is currently not working
- "Sorting-downwards" will position your element "at the bottom" of the list
We are analysing these behaviours and will enhance the sorting functionality in one of our next versions.
Tipp: it may be easier to achieve your desired order of elements, if you drag-n-drop them in this specific order into the "...selected for this..." area.
The smaller of both drag-n-drop areas is fixed positioned. So you should always see it on-screen, independent of where you scroll to in the bigger area. If the relation in length changes during your drag-n-drop actions, and you cannot scroll to relevant parts of one of the areas, please use the [Save] button to store the current status - this will reset the fixation to the correct drag-n-drop area.
Setting up the Scheduler
jDBexport comes with a powerful scheduler to automate delivery of recurring reports. Setting up this scheduler consists of two separate parts, the first of which is described in the main functionality chapter Schedules. The second part is described here.
In general, you need to call jDBexport's frontend task [allschedules] (and/or [schedule] ) repeatedly at interval times. As the shortest interval of jDBexport's scheduler is one hour, we suggest you call this task at least every sixty minutes (most customers prefer to call the frontend task every 15 to 30 minutes). If the scheduler finds no tasks to be run at any certain calls, it will just update the time-last-called and end again without doing anything else.
jDBexport frontend task [allschedules]
This is the preferred task, as it runs all scheduled tasks in one single step. The frontend task is called by an URL of the following form:
HTTPS://www.YourWebsite.com/index.php?option=com_jdbexport&task=allschedules&firstkey=YOURSCHEDULERSECURITY01
where YOURSCHEDULERSECURITY01 refers to the scheduler security "password" you provided in the first to-run scheduler's detail view in the administration. You can define the order in which multiple schedules are executed, by using the [Sequence] field in the administration view.
In some environments, you might have to "escape" the & characters in the URL, e.g. use & instead
jDBexport frontend task [schedule]
The frontend task is called by an URL of the following form:
HTTP://www.YourWebsite.com/index.php?option=com_jdbexport&task=schedule&id=YOURSCHEDULERID&key=YOURSCHEDULERSECURITY
where YOURSCHEDULERID refers to the ID of the scheduler task
where YOURSCHEDULERSECURITY refers to the scheduler security "password" you provided in the scheduler's detail view in the administration
Please note, that you have to call the frontend task FOR EACH existing scheduler individually, if you use this variant.
In some environments, you might have to "escape" the & characters in the URL, e.g. use & instead
Executing the task
As PHP or JOOMLA do not support a decent task scheduler, you need to set this up manually. There are multiple solutions for this task:
Solution 1 : utilising the CRONJOB interface from your hosting provider.
So this solution consists of filling out the corresponding form on your ISP's webserver control panel, so this should be explained there. You need to enter the above named URL and the interval into this form, maybe any additional information and access credentials.
Solution 2 : using a service provided over the internet, e.g. webcron.org (or others).
this is described in detail on webcron.org website, although you better stick to their french original or english translation (the other translations have their own charmes). You need to enter the above named URL and the interval into this form, maybe any additional information and access credentials.
Solution 3 : setting up a repeating OS job on your server
This is explained in detail here:
This is the solution we prefer for all kind of scheduled and repeated tasks (because it is the most flexible of all three methods) on our and our customers websites (like backup, newsletter mailings, updating "featured elements", ...). We run this on a windows server, so if you use a different operating system, the steps will be slightly different. However, the core elements will be compareable. You need:
- a "local" computer, that is connected to the internet 24x7
- a cron script utility like GNU Wget (we use the 64bit version courtesy of Jernej Simon─ìi─ì) or cron as a means of accessing the function
- a script that runs on your "local" computer (we use Windows BATCH scripting language for this)
- a scheduled task on your "local" computer to run this script
The script on your "local" computer would then look somewhat like the following (for clarification, we do this step by step, but you could combine all of the settings into line 13 and have one line only).
Line 1
Line 2
Line 3
Line 4
Line 5
Line 6
Line 7
Line 8
Line 9
Line 10
Line 11
Line 12
Let us go through this line by line - remember we are using MS DOS Batch programming for this!
- Line 1 This is used to reduce the output messages of the script to the minimum
- Line 2 Use this to define the HTTP protocol (either HTTPS - recommended, or HTTP)
- Line 3 Use this to define the domain of your Joomla website
- Line 4 If your website is behind a .htaccess file (or similar), use these to provide the credentials
- Line 5 If your website is behind a .htaccess file (or similar), use these to provide the credentials
- Line 6 For security reasons, you need to provide the Scheduler Key of the first scheduled task
- Line 7 This is a comment line
- Line 8 If your website is behind a .htaccess file (or similar), add these parameters in line 11 (without the "rem" of course)
- Line 9 This is a comment line
- Line 10 Put the URL together from the above parameters
- Line 11 Call WGET with the URL from line 10 and additional parameters
- Line 12 This is a comment line
Please note the parameter --no-check-certificate in Line 11. This is used to avoid certificate validation issues in WGET, if the root CAs are not accessible.
The next step would be to execute this script on a defined interval. You should set up a scheduled task on your local computer (using the Windows Server 2008 Task Scheduler in this example):
-
on your local server navigate to Start > All Programs > Administrative Tools > Server Manager. This brings you to the Server Manager interface
-
Drill down to Configuration > Task Scheduler
-
On the right hand side of the interface, click Create Basic Task. Give the task a name and description. Click Next
-
Select the radio button for how often the task should run: Daily, Weekly, Monthly, one time only, when the computer starts, when I log in, or when a specific event is logged (once the task is created, you can edit it and fine-tune the repeating cycle). Click Next
-
Select a start time, how often to perform the task, and an end time. Click Next
-
Configure the task to Start a Program, Send an e-mail, or display a message by selecting the appropriate radio button. Click Next
-
Browse to the program or script and enter in any arguments or paths to start in. Click Next
-
Select the checkbox for Open the Properties dialog for this task when I click Finish if you wish to configure the task further. Click Finish
-
The Advanced Properties window will appear. Configure the task further to your liking by adding comments to the task, telling the task when to run (only if logged in or otherwise), deleting the task after its run if it's scheduled to not run infinitely, to reschedule the task if it is missed, and so forth. Click Finish
After doing so, the task is setup and will run if configured properly (and if not, please read on...)
Debugging the schedule
Always make sure the schedule "run now" button in the backend [Schedules] page returns OK. If it doesn't, then check
If the schedule "run now" returns ok, but you belief the scheduled task runs ok when executed by cron, please check:
Try executing the schedule script from the command line (if you do have command line access to the server). There might be error messages that can help you figure out the problem.
Now you can excute the script from command line (if you have access to command line) or run the Scheduler with cron. The debug and eventual error messages will be sent to cron and you typically get an email with the output.
Using AI to develop your SQL query
Artificial intelligence (AI) is playing an increasingly important role in the world of technology, from automating tasks to improving decision-making processes. One area where AI has the potential to make a significant impact is in database management, particularly when it comes to generating SQL queries. Traditionally, generating SQL queries requires a skilled and experienced database expert, such as a MariaDB expert familiar with the Joomla CMS database. However, with the advancements in AI technology, this process can now be automated and simplified. AI-powered tools can analyze a database schema, understand its structure, and identify relationships between various tables. This information is then used to generate the necessary SQL code for specific queries. As AI systems learn from previous operations, they become more efficient at identifying patterns and making accurate query recommendations.
With AI-generated SQL queries, developers and database administrators can save time and effort. They no longer have to manually write complex SQL statements, and they can focus on other tasks that require their expertise. Additionally, AI can also help in optimizing queries by suggesting alternative ways to retrieve data that may be more efficient. This results in faster query execution times and improved overall performance of the database. Furthermore, AI-powered SQL generation can also enhance security by automatically detecting any potential security vulnerabilities and suggesting measures to address them.
In conclusion, AI is revolutionizing the way SQL queries are generated, making it easier and more efficient for MariaDB experts and other professionals to manage databases. With AI, the process of generating SQL queries is not only faster and more accurate but also frees up valuable time for experts to focus on more critical tasks.
(The three paragraphs above were the response of ChatGPT to the prompt "create a text that explains how AI can be used to generate SQL queries" from within jDBexport - where "MariaDB expert" and "Joomla CMS database" are automatically added to each request.)
Starting with jDBexport version 4.0.7 we include an interface to OpenAI's ChatGPT. In the help tabs below the "SQL query" field for a worksheet you will find a new tab called "SQL by AI". This tab presents you an input field, where you can submit your (natural language) query requirements. Then hit the ChatGPT button, and you will find the AI's suggestion on how to write this SQL query in the response box below.
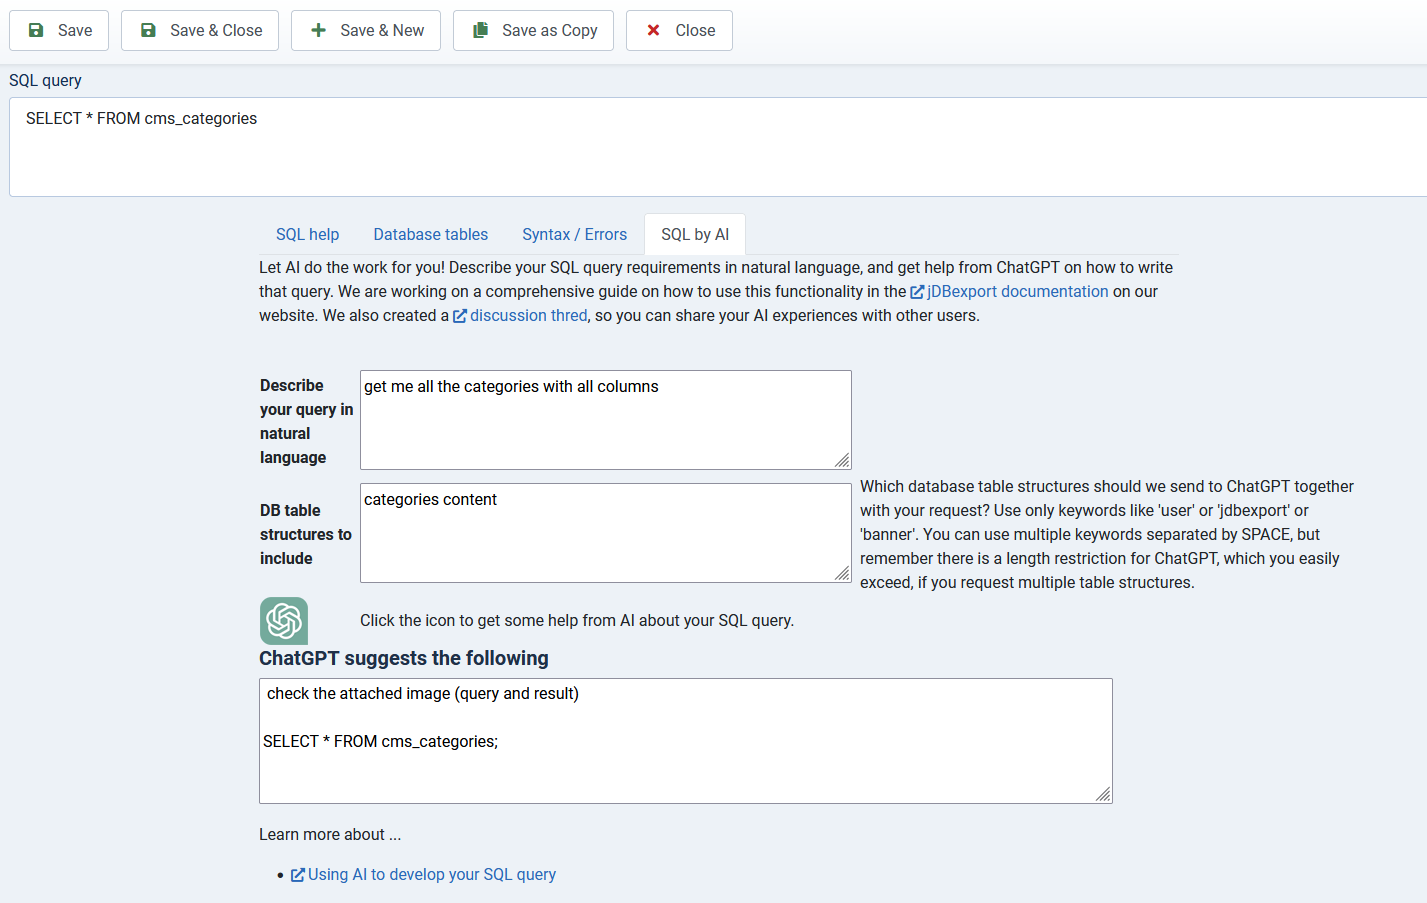
We automatically add some information (database type: MySQL, MariaDB, ... / database table prefix) about the database your query is targeting (either the Joomla database or any other database you already connected to jDBexport). So you do not need to specify these. You can use natural (preferrable english) language to describe your required query, something like: "get me all the categories with all columns", and ChatGPT will respond with some suggestions on how to do that:
To get all categories from the Joomla CMS database with all columns, you can use the following query:
SELECT * FROM cms_categories;
This will retrieve all columns (fields) from the categories table in the Joomla database, regardless of the database table prefix being used.
DB table structures to include
Starting with jDBexport version 4.0.8, we enhanced the AI interface significantly. You now can include the structures of certain tables you want to query. This will greatly increase the quality of ChatGPT's responses, as you are giving specific information about how the tables are structured. To include certain tables, just list a keyword from their database table name, e.g. 'content' for the articles tables, 'action' for the action_logs tables, 'user' for all tables concerning your users, 'jdbexport' for all of this components tables, and so on.
You can add multiple keywords, if you separate them by SPACES. However, adding those tablestructures increases the length of your request considerably. This has two consequences:
- The longer your request is, the more it costs
- There is a length restriction when using ChatGPT. If your total request exceeds the available length, you will not get a useful answer, but only a respective error message:
Something went off the rails. We could not get a valid answer from ChatGPT. Statuscode:701 Errormessage: ChatGPT could not process your request / additional information: Uncaught OpenAI Exceptions ErrorException: This model's maximum context length is 4097 tokens, however you requested 6996 tokens (5996 in your prompt; 1000 for the completion). Please reduce your prompt; or completion length.
Requirements to use this feature
In order to use this feature, you need
- an active subscription for jDBexport
(an expired subscription will not allow you to submit further ChatGPT requests) - your subscription is limited to a maximum of EUR 1.00 "ChatGPT usage",
per year (which we strongly belief is enough for most users), as we need to buy respective ChatGPT credits - to update your jDBexport "Download ID"
which you can find in the download area on our website.
The cost for using AI
We are currently using "GPT-3.5 Turbo" as the LargeLanguageModel for this feature. A request which is just below the length limit for this model, costs about EUR 0,0065
Once "GPT-4" will be available to us, we might include this model as well - it doubles the allowed length for the request, but also increases the costs. A request which is just below the length limit for this model, will cost about EUR 0,30 - however these prices might change once GPT-4 will reach a wide usage.
If you use this tool and are willing to share your experience, we created a respective discussion thred in our user forum for you to reply.
APPENDIX
Workbook document formats
jDBexport comes with a variaty of document formats you can use to create your workbooks. Special considerations concerning each document format are described in this chapter.
Microsoft Excel 2007 (*.xlsx)
 The Microsoft Excel 2007 document writer is the main (and default) document writer of the component. With this writer you have the most comprehensive set of content and formatting options (not all content and formatting options are available in all other document writers).
Microsoft Excel 2003 (*.xls)
 The Microsoft Excel 2003 document wirter creates XLS documents using the old BIFF (binary interchange file format) as used in Microsoft Excel 2003 (and before). This is provided as a legacy document writer, but there are various restrictions concerning content and formatting options in this document writer due to the capabilities of the underlying Microsoft Excel version.
OpenOffice.org has created a documentation of the Excel format. Since then Microsoft made the Excel binary format specification available to freely download.
OpenDocument spreadsheet (*.ods)
 The Open Document Format for Office Applications (ODF), also known as OpenDocument, is an XML-based file format for spreadsheets, charts, presentations and word processing documents. It was developed with the aim of providing an open, XML-based file format specification for office applications.
The standard was developed by a technical committee in the Organization for the Advancement of Structured Information Standards (OASIS) consortium. It was based on the Sun Microsystems specification for OpenOffice.org XML, the default format for OpenOffice.org, which had been specifically intended "to provide an open standard for office documents." In addition to being an OASIS standard, it was published as an ISO/IEC international standard ISO/IEC 26300 – Open Document Format for Office Applications (OpenDocument).
Comma separated values (*.csv)
 The CSV document writer produces a comma-separated document, that can be used as importfile for many applications. You can set the field separator (default is comma) and the text delimiter (default is double-quote) for all CSV workbooks on the [Workbooks] tab of the components options dialog, or for an individual CSV workbook on the [Advanced] tab of the workbook view.
The CSV document writer only creates the first worksheet of a workbook. No other worksheets are created.
The CSV document writer ignores all formatting information, either for the main query, headings, extracells or cell formatting.
Hypertext Markup Language (*.html)
 The HTML document writer ...
Adobe portable document (*.pdf)
 The PDF document writer produces standard *.pdf documents. The most important difference between this writer and all the other ones is, that PDF embeds the used fonts, so the end user does not have to have the respective fonts installed on his computer. However, this means that you have to provide the relevant fonts for creating the document on the server - see the respective chapter Adobe pdf and TrueType fonts in this documentation.
Javascript Object Notation (*.json)
 The JSON document writer produces an object for each row with a NAME:VALUE pair for each column, separated by a comma. For details please visit the JSON website . You can use the components option dialog tab [Workbooks] to define whether or not linebreaks should be included in this JSON object (for improved readablility).
The JSON document writer only creates the first worksheet of a workbook. No other worksheets are created.
The JSON document writer only takes into account the results of the main SQL query, so no extra cells are rendered in the output document.
The JSON document writer ignores all formatting information, either for the main query, headings, extracells or cell formatting.
The JSON document writer requires the [Show column heading] set to YES on the [Layout] tab of the worksheet view.
Other document output formats
If the above list of document formats is missing an option you are needing, we can always develop this option individually for you. Please contact us to discuss the details.
Database connections
With jDBexport, you can create reports not only from the JOOMLA database. You also can connect to external databases. Go to the [Databases]->[NEW] window and enter the required connection details (the details differ with different types of databases):
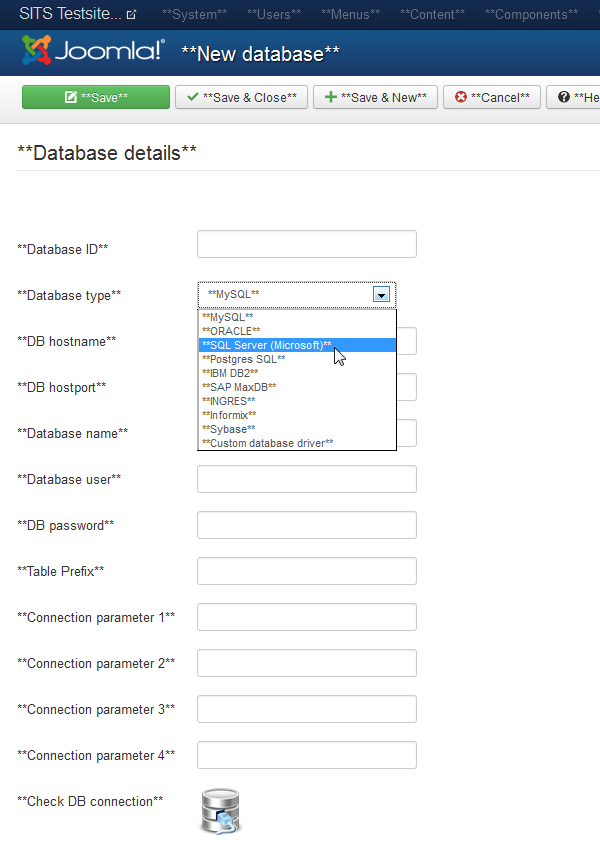
Once you saved the connection details for this database, you can check whether the connection can be established or not by clicking on the [Check connection] icon.
Save the configuration and check, whether the connection to this database is successful.
IMPORTANT
Please note, that in order to use these database drivers, your webserver's PHP installation needs the respective vendor specific database extension being activated, and the database needs to be accessible by your PHP installation.
Please note that not all database drivers are thoughouly tested in all possible environments, and some are experimental only. If you expirience trouble using these database drivers, please contact us directly to find a solution. We are always interested in enhancing the list of database connectors for jDBexport!
Connecting to MySQL
![]()
For connecting to a MySQL database you will need the following connection parameters:
- DB Hostname (the host name for the MySQL instance. This can be a fully qualified DNS name or LOCALHOST, an IP address or you can leave this empty for the local host)
- DB Hostport (the port the MySQL instance is listening to, this can be left empty if you are using the default port 3306)
- DB Name (the name of the database)
- DB Username (the username needed to get access to the database)
- DB Password (the password needed to get access to the database)
- DB Table prefix (you can specify this if you want)
Connecting to ORACLE
![]()
For connecting to a ORACLE database you will need the following connection parameters:
- DB Hostname (the host name for the ORACLE instance. This can be a fully qualified DNS name or LOCALHOST, an IP address or you can leave this empty for the local host)
- DB Hostport (the port the ORACLE instance is listening to, this can be left empty if you are using the default port, usually 1521)
- DB Name (the name of the database)
- DB Username (the username needed to get access to the database)
- DB Password (the password needed to get access to the database)
- DB Parameter 1 designates the type of connection
- "EasyConnect"
- "tnsnames.ora"
- "LocalInstance"
- empty
- DB Parameter 2 holds the relevant information for the connection type
- if DB Parameter 1 = "EasyConnect", then it contains the service name (default is "XE")
- if DB Parameter 1 = "TNSnames.ora", then it contains the connect name from the tnsnames.ora file
- if DB Parameter 1 = "LocalInstance", then it contains the name of a local ORACLE instance
- if DB Parameter 1 is empty, then an EasyConnect connection to the "XE" service on the DB Host (with DB Port if provided) is assumed.
Notes:
- Service names can be found by running the Oracle utility lsnrctl status on the database server machine
- The tnsnames.ora file can be in the Oracle Net search path, which includes $ORACLE_HOME/network/admin and /etc. Alternatively set TNS_ADMIN so that $TNS_ADMIN/tnsnames.ora is read. Make sure the web daemon has read access to the file.
Connecting to MICROSOFT SQL or AZURE
![]()
For connecting to a Microsoft SQL Server or MS Azure database you will need the following connection parameters:
- DB Hostname (the name of the server to which a connection is established. To connect to a specific instance, follow the server name with a forward slash and the instance name (e.g. serverName\sqlexpress).
- DB Name (the name of the database)
- DB Username (the username needed to get access to the database)
- DB Password (the password needed to get access to the database)
There are a number of additional connection parameters for SQL Server connections (as described at MSDN.microsoft.com ) . If you need one or more of these connection parameters, you can provide them in the field DBParameter1
Each parameter setting is in the form KEYWORD=VALUE (without spaces around the equal sign), separated by semicolon.
Please note that we use the connection parameter CharacterSet with the value UTF-8 by default. If you need the CharacterSet to use SQLSRV_ENC_CHAR as value, you need to put this KEYWORD=VALUE combination into the field DBParameter1
Please note that we use the PHP extension SQLserver, which is supported by Microsoft and can be downloaded from their site . This extension is provided for Windows operating systems only. If you need to connect to a SQL Server database from a non-Windows server (Linux, UNIX, ...) you can either use our customized database driver MSSQL or the respective PDO-ODBC driver (see next chapter Using a customized database driver for more details).
Connecting to PostgreSQL
![]()
For connecting to a PostgreSQL database you will need the following connection parameters:
- DB Hostname (the host name for the PostgreSQL instance. This can be a fully qualified DNS name or LOCALHOST, an IP address or you can leave this empty for the local host)
- DB Hostport (the port the PostgreSQL instance is listening to, this can be left empty if you are using the default port 5432)
- DB Name (the name of the database)
- DB Username (the username needed to get access to the database)
- DB Password (the password needed to get access to the database)
- OPTIONS (if you need this connection parameter), can be defined in the field DBParameter1
There are a few additional connection parameters for PostgreSQL connections (as described in the PHP function manual for pg_connect() . If you need one or more of the following connection parameters, you can provide them in the field DBParameter2
- hostaddr
- connect_timeout
- sslmode
- service
Each parameter setting is in the form KEYWORD=VALUE (without spaces around the equal sign), separated by whitespace.
Connecting to IBM DB2
For details on this database driver, please contact us
Connecting to SAP MaxDB
![]() For details on this database driver, please contact us
For details on this database driver, please contact us
Connecting to INGRES
For details on this database driver, please contact us
Connecting to FIREBIRD
![]()
For connecting to a FIREBIRD database you will need the following connection parameters:
DB Hostname
DB Name (the name of the database)
DB Username (the username needed to get access to the database)
DB Password (the password needed to get access to the database)
- DB Parameter 1 (the string in this field defines the connection method to be used):
- TCP/IP
- NetBEUI
- IPX/SPX
- empty string will connect with "TCP/IP" method
Connecting to MariaDB
![]()
For connecting to a MariaDB database you will need the following connection parameters:
- DB Hostname (the host name for the MariaDB instance. This can be a fully qualified DNS name or LOCALHOST, an IP address or you can leave this empty for the local host)
- DB Hostport (the port the MariaDB instance is listening to, this can be left empty if you are using the default port 3306)
- DB Name (the name of the database)
- DB Username (the username needed to get access to the database)
- DB Password (the password needed to get access to the database)
- DB Table prefix (you can specify this if you want)
Connecting to SQLite3
![]()
For connecting to a SQLite3 database you will need the following connection parameters:
- DB Name (the name of the database file - including filename extension)
- DB Password (use this for the Encryption key, leave empty if the database is not encrypted)
- DB Parameter 1 (the full physical path to the database file)
- DB Parameter 2 (flags to determine how to open the database)
Flags how to open the database
DB Parameter 2 holds the optional flags used to determine how to open the SQLite database. By default, jDBexport as a reporting instrument uses "SQLITE3_OPEN_READONLY" , this is different from SQLite standard value "SQLITE3_OPEN_READWRITE | SQLITE3_OPEN_CREATE". So if you leave DB Parameter 2 empty, the database must already exist and will be opened "read-only".
Allowed values for this parameter are:
SQLITE3_OPEN_READONLY : Open the database for reading only
SQLITE3_OPEN_READWRITE : Open the database for reading and writing
SQLITE3_OPEN_CREATE : Create the database if it does not exist
and (reasonable) combinantions of these, concatenated with the | symbol.
For details on how to use these parameters, please refer to the PHP SQLite3 __CONSTRUCT function description, which is used by jDBexport.
Please note that SQLite3 is not intended to operate in distributed environments, you will have to have your database on the same server as your PHP installation (see Stackoverflow.com 18711418 - access sqlite database file in a remote server with php ).
Note on security: you can hide the full physical path to your SQLite3 database (DB Parameter 1) from being displayed by using the substitution variable [SQLITE3ROOT] as a prefix in this path info. The value to be used instead of this substitution variable can be defined in the jDBexport options dialog [Advanced] tab. For an example of this, see our demo website.
Connecting to databases through PDO
![]()
For connecting to a large number of different databases you can use the PHP Data Objects abstraction layer. Currently, only ODBC is implemented with it's driver types MySQL and MSSQL . If you need any of the other drivers or driver types that PDO supports, we can implement this for you. Please contact us to discuss the details.
- DB Hostname
- DB Portnumber
- DB Name (the name of the database)
- DB Username (the username needed to get access to the database)
- DB Password (the password needed to get access to the database)
- DB Parameter 1 (fixed value "jdbexportDBpdo.php", without the quotes)
- DB Parameter 2 (PDO driver. Currently only "ODBC" is supported).
- DB Parameter 3 (PDO driver type. Currently only "MySQL" and "MSSQL" are supported).
Connecting to a customized database driver
![]() see the corresponding chapter below for detailed information.
see the corresponding chapter below for detailed information.
Using a customized database driver
jDBexport provides a set of database drivers to connect to a variaty of database systems. If you need to connect to any database system not available by default, you can create a custom database driver and use it (if you need additional information or support, please do not hesitate to contact us).
You can name this database driver however you want, but you have to store it in the following directory of your site:
/httpdocs/components/com_jdbexport/helpers/database.drivers/
and the classname must be identical to the filename (without the .php extension of course).
Within jDBexport, you can address this database driver by creating a new database connection and using the [Connection parameter 1] to store the correct filename (but without any path information) of the database driver (eg. "jdbexportDBphpAPImySQLi.php" for the script jdbexportDBphpAPImySQLi.php , which is provided as an example). jDBexport expects this.
As a starting point for you to develop, jDBexport comes with three additional database drivers.
- One is utilising the standard PHP MySQL api, you can use this, if you want to connect to MySQL databases not supported by JOOMLA, e.g. MySQL 5.0.x
- The other one utilisis the PHP extension MSSQL to connect to SQL server databases. You can use this, if the standard SQL Server driver is not supported on your webserver.
- The third one (available since jDBexport 3.2.8) uses the PHP PDO database abstraction layer. Implemented in this driver are PDO ODBC drivers for MS-SQL and MySQL. But it should be straight-forward to add any additional PDO drivers into this driver. Details on this will follow soon...
Copy the script file and rename it to reflect your database driver. Make sure the driver class in this script file is named identically.
You need to create two to five methods in this class to implement all available functionality.
function "connect"
This method of the class connects to the database. You need to provide the connection infos and perform a simple query (retrieving the current system time from the database).
function "query"
This method executes a query against the database.
function "getDBhelplink"
You can omit this, if you don't need it...
This method returns a web link to some online SQL reference manual. This link is used in the [SQL Help] tab below the SQL query field on the [General] tab of the worksheet view.
If you want to specify the reference manual reflecting the exact version of your database, you can use the ['version'] attribute of the $database_connection array.
function "getDBtablesAndColumns"
You can omit this, if you don't need it...
This method returns an array of objects representing all tables and their columns in the database. This is used in the [Database tables] tab below the SQL query field on the [General] tab of the worksheet view.
function "test"
This is currently not needed!
This method of the class performs a simple query (retrieving the current system time from the database).
SQL: a (very) short introduction
From Wikipedia:
SQL (Structured Query Language) is a special-purpose programming language designed for managing data in relational database management systems (RDBMS). Originally based upon relational algebra and tuple relational calculus, its scope includes data insert, query, update and delete, schema creation and modification, and data access control. SQL was one of the first commercial languages for Edgar F. Codd's relational model, as described in his influential 1970 paper, ´A Relational Model of Data for Large Shared Data Banks´. Despite not adhering to the relational model as described by Codd, it became the most widely used database language. Although SQL is often described as, and to a great extent is, a declarative language, it also includes procedural elements. SQL became a standard of the American National Standards Institute (ANSI) in 1986, and of the International Organization for Standards (ISO) in 1987. Since then, the standard has been enhanced several times with added features. However, issues of SQL code portability between major RDBMS products still exist due to lack of full compliance with, or different interpretations of, the standard. Among the reasons mentioned are the large size and incomplete specification of the standard, as well as vendor lock-in.
SQL and jDBexport
jDBexport is designed as a data reporting instrument, and as such can only export data, not import - hence the name jDBexport. In relation to SQL this means that only the SELECT statement is what you need from SQL (in fact most other SQL statements - like ALTER, CREATE, DELETE, DROP, GRANT, INSERT, KILL, LOAD, LOCK, RENAME, REPLACE, REVOKE, SET, TRUNCATE, UPDATE - are activly disallowed in jDBexport for security reasons). Such SELECT statements can become very complex, but let us start with a simple example and get more complex step by step...
Select statements
- SELECT * FROM MYTABLE
will select all columns for all rows from the table MYTABLE - SELECT FIRSTNAME, LASTNAME, CITY FROM CUSTOMERS ORDER BY CUSTOMER_ID
will select the columns FIRSTNAME and LASTNAME and CITY for all rows from the table CUSTOMERS and order the resulting data by ascending CUSTOMER_ID
(the default sort order is ASC, if you want to order descending, simply add the keyword DESC after the column name to be sorted) - SELECT ARTICLE_ID AS ID, ARTICLE_DESC AS DESCRIPTION FROM ARTICLES WHERE ARTICLE_PRICE > 35.48 AND ARTICLE_STATUS = 'active'
will select the articles ID and description for those 'active' articles that are more expensive than 35.48
[to be continued]
You can always go deeper into this by searching the web, for example at Wikipedia SQL Select .
A beautiful example of what SQL is actually capable of is the following query, which one of our customers showed us ... ![]()
Workbook caching
There are TWO different issues to be discussed here:
- the jDBexport Caching directory
- caching methods during the creation of workbooks
jDBexport CACHING directory
Once a workbook is created, it is stored in jDBexport's own caching directory. This directory is located at httpdocs/media/com_jdbexport/documents . Whether the workbook is KEPT in the caching directory or is deleted depends on the circumstances the workbook is created in.
Circumstances, where Cachefile is KEPT
- Creating the workbook by the scheduler and sending out Links to that workbook requires the workbook to be kept in the caching directory (otherwise the links would not work ;-)
- Creating the workbook by clicking on the Google DocViewer icon requires the workbook to be kept in the caching directory (otherwise the Google DocViewer could not access the document
- Creating the workbook with the prepareDocument function requires the workbook to be kept in the caching directory (otherwise your own programs could not access the document
- and finally, if you enable [Debug component] in the component configuration options [Advanced] tab, then the cachefile will be kept under all circumstances!
In all other circumstances, the cachefiles are expected to be deleted at the end of the process. This leads to the fact that there will be a number of old cachefiles sitting in the directory, and we cannot automatically clean the caching directory (because we do not know when users activate the links they received by the scheduler email). To avoid this caching directory being filled up with old files, jDBexport comes with a "Clear cache" functionality.
From the jDBexport main page (in the administration backend) you can open the "Clear cache" dialog by activating the corresponding button. This dialog lists all files that are present in the caching directory, and provides a delete function: just click on the [Delete] button next to the file you wish to delete. Or tick those files you want to delete (or all of them) and click on the [Delete all] button at the end of the list.
Caching methods during creation of workbooks
jDBexport requires an average memory amount of about 1k per cell in your worksheets, so large workbooks can quickly use up available memory. Cell caching provides a mechanism that allows jDBexport to maintain the cell objects in a smaller size of memory, on disk, or in APC, memcache or Wincache, rather than in PHP memory. This allows you to reduce the memory usage for large workbooks, although at a cost of speed to access cell data.
By default, jDBexport holds all cell objects in PHP memory, but you can specify alternatives. In the components OPTIONS dialog, on the [Advanced] tab, you can select the caching method that suits your environment best. Currently jDBexport offers the following caching methods.
in PHP memory
The default. If you don’t select any caching method, then this is the method that jDBexport will use. Cell objects are maintained in PHP memory as at present.
in PHP memory, serialized
Using this caching method, cells are held in PHP memory as an array of serialized objects, which reduces the memory footprint with minimal performance overhead.
in PHP memory, serialized and ZIP compressed
Like the previous one, this method holds cells in PHP memory as an array of serialized objects, but gzipped to reduce the memory usage still further, although access to read or write a cell is slightly slower.
gin PHP memory, serialized by IGBinary
Like the previous one, this method holds cells in PHP memory as an array of serialized objects, but gzipped to reduce the memory usage still further, although access to read or write a cell is slightly slower. This method uses PHP’s igbinary extension (if it’s available) to serialize cell objects in memory. This is normally faster and uses less memory than standard PHP serialization, but isn’t available in most hosting environments.
on disc as ISAM
When using this method, all cells are held in a temporary disk file, with only an index to their location in that file maintained in PHP memory. This is slower than any of the "cache in memory" methods, but significantly reduces the memory footprint. jDBexport will use PHP’s temp directory for the cache file. The temporary disk file is automatically deleted when your script terminates.
on disc as PHP Temp I/O stream
Like "cache on disc as ISAM", when using this method all cells are held in the php://temp I/O stream, with only an index to their location maintained in PHP memory. In PHP, the php://memory wrapper stores data in the memory: php://temp behaves similarly, but uses a temporary file for storing the data when a certain memory limit is reached. The default is 1 MB, but in future releases of jDBexport, you will be able to change this limit. The php://temp file is automatically deleted when your script terminates.
in APC
When using APC caching, cell objects are maintained in APC with only an index maintained in PHP memory to identify that the cell exists. By default, an APC cache timeout of 600 seconds is used, which should be enough for most applications. In future releases of jDBexport, it will be possible to change this setting. When your script terminates all entries will be cleared from APC, regardless of the cacheTime value, so it cannot be used for persistent storage using this mechanism.
in MEMcache
When using MEMcache, cell objects are maintained in memcache with only an index maintained in PHP memory to identify that the cell exists.
By default, jDBexport looks for a memcache server on localhost at port 11211. It also sets a memcache timeout limit of 600 seconds. In future releases, it will be possible to set a different server or port. When your script terminates all entries will be cleared from memcache, regardless of the cacheTime value, so it cannot be used for persistent storage using this mechanism.
in WINcache
When using WINcache, cell objects are maintained in Wincache with only an index maintained in PHP memory to identify that the cell exists. By default, a Wincache cache timeout of 600 seconds is used, which should be enough for most applications. In future releases of jDBexport, it will be possible to change this setting. When your script terminates all entries will be cleared from Wincache, regardless of the cacheTime value, so it cannot be used for persistent storage using this mechanism.
as SQLITE 2 in memory database
Uses an SQLite 2 in-memory database for caching cell data. Unlike other caching methods, neither cells nor an index are held in PHP memory - an indexed database table makes it unnecessary to hold any index in PHP memory – making this the most memory-efficient of the cell caching methods.
as SQLITE 3 in memory database
Uses an SQLite 3 in-memory database for caching cell data. Unlike other caching methods, neither cells nor an index are held in PHP memory - an indexed database table makes it unnecessary to hold any index in PHP memory – making this the most memory-efficient of the cell caching methods.
Troubleshooting tips
Corrupted XLSX documents
It can happen that your (complex) Excel documents will not open in your desktop software. This can have any number of reasons. A good starting point is to analyse the document with the help of Microsoft's Open XML SDK 2.0 Productivity Tool .
Generally, when having trouble with a worksheet, it is a good idea to change the document format to CSV. This format is far more permissive than the others, and you get better chances to dedect any error in your data.
Debugging the component
For extension developers JOOMLA environments can be challangingly different across the internet. It is virtually impossible to predetermain any possible combination of environments, so it is a best-practice approach to prepare an extension to provide additonal information about it's behaviour in the case something does not work as expected...
For jDBexport, we implemented the [Debug component] option on the [Advanced] tab of the components configuration dialog. Turning this option to YES will give additional information. But most likely, this will be unwanted in normal operation of the website (probably interferring with your template layout). We here aim to give you an overview of what one can expect from this option.
- The "Error reporting" (from the Joomla global configuration, the [Server] tab) is set to "Development", allowing the maximum of error and warning messages to be displayed, rather than showing just an white, empty page as happens normally, when a PHP error occurs.
- cached documents are not deleted after the creation, they will sit in the caching directory until you manually delete them.
- ...
HTTP Error 503 - service not available
Some hosting service providers (namely 'one.com') do not allow to directly output Excel documents to the client browser, they consider this approach to be 'dangerous'. The hosting server produced a 'http 503 service not available' error message, and the Excel document is not created (other documents like CSV, HTML, JSON and PDF are created without any warning).
To circumvent this Hosting Service Provider restriction, we implemented a jDBexport service at https://service.schultz.ch/jdbexport . If you activate the respective option [Use external download] in the component options dialog [Advanced] tab, then the named service is used to output the Excel document to the user's browser (instead of your own server). In normal situations, the following process is executed when a document is created:
- A temporary file is created on your server (with the result from your query and formatting information)
- An URL is rendered to access this file with the DownloadDocument.php script
- An embedded IFRAME is created with this URL as source
- The DownloadDocument.php script reads this file, and subsequently writes it directly to the browser
- The browser itself initiates the "Open or save document" popup box
- The temporary file is deleted on your server
With the above named option activated, the main difference is that in step 2, the URL is not pointing at YOUR SERVER, but rather at https://service.schultz.ch/jdbexport . At this address, the very same DownloadDocument.php script is availabe, but to successfully run, the script needs first to get the temporary file from your server and store it locally. The rest of the process is identical with the above described process.
This allows you to circumvent the restriction your Hosting Service Provider applied.
Restricting users from accessing certain database tables
Starting with version 3.2.2 jDBexport allows you to define a set of rules to prevent certain users from accessing certain database tables.
Please note, that you also have to prevent these users from "configuring the component" by means of JOOMLA ACL settings. Otherwise they can easily revert these access restrictions.
Performance issues
Server execution timeout error
Creating large and/or complex (lots of formatting and formula calculating) Excel workbooks can be extremly demanding on the webserver's available resources (PHP execution time AND / OR memory usage). To avoid the latter, you can experiment with the different Caching methods jDBexport provides. Dealing with the former is far more complex.
Depending on various variables, the available execution time of the PHP server can be reached during creation of worksheets for a workbook. We are constantly working on different solutions to this issue. If you come across this issue, there are a few options jDBexport offers you:
- Setting [Formula precalculation] to NO
- Reduce formatting
- Override the servers PHP max execution time
- Use the alternative Excel writer
- Use the "background processing" feature
Setting [Formula precalculation] to NO
This is an option in the components [Options] dialog on the [Workbooks] tab. It tells the component NOT to precalculate any formulas you might use in the worksheets. This will reduce the creation time somewhat, depending on how heavy you are using formulas in the respective worksheets.
Reduce formatting
Making the resulting document less formatted is a good way to save execution time. However it is not so much the number of formatting options on each cell that acount for execution time, as the number of cells to be formatted. jDBexport applies all defined formats in one step on each selected cell, so it has to loop through the defined cellrange and address each cell individually. In a worksheet with 5000 rows and 25 columns this results actually in 125.000 formatting operations. Whether you only apply a different fontsize, or a full scale formatting with font, fontsize, fontcolor, alignments, background color and borders, makes not much a difference in respect to execution time.
Override the servers PHP max execution time
jDBexport allows you to override this server configuration. In the component's [Workbook] dialog, on the [Advanced] tab you find a new option [Execution time for worksheet creation] .
This option tries to override the webserver's execution time setting, and the named amount of cpu seconds is granted to each individual worksheet. You can set this option to a value between 30 cpu seconds and 180 cpu seconds (Zero means NO OVERRIDING of the webserver's setting). In certain environments, overriding this setting is disallowed by the server configuration (if this is the case, the option is ignored).
This can be used as a short term solution, when you run into server executiontime problems, but should not be used as a standard.
Use the alternative Excel writer
Starting with version 3.1.3, jDBexport offers an alternative Excel writer. The default writer library PhpSpreadsheet supports almost any feature you know from Microsoft Excel itself (although not all of these features might be implemented in jDBexport). The Microsoft Excel *.xslx format is a complex structure of files and data (all combined into one ZIP compressed file), creating such a structure for large workbooks simply IS requireing a lot of resources - there is no way out here.
If your primary intent is to get your large Excel workbooks to your users, and you do not mind if these workbooks are less "fancy" looking, then you can switch to this alternative Excel writer (you find the corresponding option on the [Advanced] tab of the workbook edit view).
This writer creates a Microsoft formatted XML document, which can be opened directly in Microsoft Excel (and other spreadsheet applications).
Use the background processing feature
Starting with version 3.1.3, jDBexport offers a new way to request documents (from within all situations, where you already could DOWNLOAD the document). This new feature is called background processing. And that's just what it is...
![]() Clicking this icon initiates the background processing. If you defined runtime parameters, they will be requested from the user before proceeding. Then a message informs the user, that his workbook is queued for creation, and the creation process starts in the background. Variable substitution is applied the same way as for downloading the document. Once this is finished, another message informs the user, that his workbook is sent to his email box.
Clicking this icon initiates the background processing. If you defined runtime parameters, they will be requested from the user before proceeding. Then a message informs the user, that his workbook is queued for creation, and the creation process starts in the background. Variable substitution is applied the same way as for downloading the document. Once this is finished, another message informs the user, that his workbook is sent to his email box.
You can define the emails subject and bodytext in the components [Options] dialog on the [Scheduler] tab. Currently, these elements do not support variable substitution.
Please note, that this feature by design is only available for logged in users. In the backend this is no issue. But in the frontend, if you offer your downloadable documents to website visitors without requiring them to login, they will not have this feature. The reason for this is easy to understand: if a website visitor isn't logged in, we cannot determine the email address the document should be sent to (and asking the user for the email address could lead to a security breach for your data).
Slice a large worksheet into multiple worksheets
If you have very large tables to be exported, we suggest you split these tables into individual worksheets with about 5000 records each. To do so, add the LIMIT clause (using the "LIMIT 0 , 5000" and "LIMIT 5000 , 5000" and "LIMIT 10000 , 5000" etc. SQL clauses correspondingly) to your SQL query in the worksheet:
- "LIMIT 0 , 5000"
Then use the [SAVE as COPY] button to create the next worksheet and
- change the [Title], [Sheetname], [Description] of the new worksheet (Warning: the sheetname HAS TO BE different, or Excel will fail to open the workbook)
- change the existing LIMIT clause to "LIMIT 5000 , 5000"
Do this as often as you need to receive all records from your database.
And at last, define the workbook with ALL the newly created worksheets.
Whether your individual query can cope with 5000 records or maybe more or maybe less, needs to be investigated individually.
Adobe pdf documents and TrueType fonts
Adobe PDF documents are different from other document types in respect to how they handle fonts. In order for users to be able to read a PDF file, they need to be able to access the necessary fonts/characters. They can do this in three ways:
- PDF documents have certain standard fonts: Arial/Helvetica, Times and Courier in the win-1252 character set, and Zapfdingbats and Symbol character sets. These fonts should be available to any PDF reading program,and do not need to be embedded in the PDF document.
- If the user has the font already installed on his computer, PDF documents can use these fonts, so the fonts need not being embedded in the document.
- Font information can be embedded in the file. It is possible to embed a subset of the font information selectively for only the characters used in the document, or the whole font file.
jDBexport uses the mPDF library for creating PDF documents. So in this respect, jDBexport supports Truetype fonts, reading and embedding directly from the .ttf font files. Fonts must follow the Truetype specification and use Unicode mapping to the characters. Truetype collections (.ttc files) and Opentype files (.otf) in Truetype format are also supported.
jDBexport PDF writer comes with two predefined fonts from the DejaVue series: "DejaVu Sans Condensed" and "DejaVu Serif Condensed". However it is easy to enhance the jDBexport PDF writer with your own additional TrueType fonts.
Step 1
Navigate to our Download aera, download the ttfonts module package. This module contains everything you need to use your own fonts. After downloading, upzip this package to a local folder on your computer.
Step 2
Browse to the ttfonts directory within the folder you just unzipped the module into. Here you already find a few additional font files:
- daniel
- EXO
- DejaVu Sans
- DejaVu Sans Mono
- DejaVu Serif
For each font, you have a set of styles (regular, bold, italic, boldItalic and so on).
Copy the *.ttf or *.otf files of the font you wish to use in jDBexport into this directory (with at least the "regular" style, and possibly with the "bold", "italic" and "boldItalic" styles).
Step 3
To make the new font available for selection in the worksheet's layout font list (and elsewhere), browse to the assets directory within the folder you just unzipped the module into. Here you already find the required fontlist.php file. This file contains an PHP array with fonts and their names.
Add a new line within the array definition reflecting your new fon (we use the EXO fontdefinition as an example here):
fontlist.php
Step 4
To make the new font available for the PDF document writer, browse to the assets directory within the folder you just unzipped the module into. Here you already find the required fontlist.mPDF_config.php file. This file contains an PHP array with fonts and their names.
Add a new line within the array definition reflecting your new font (we use the EXO fontdefinition as an example here):
fontlist.mPDF_config.php
You have to name the ttf files representing the "normal", "bold", "italic" and "boldItalic" styles respectively. Make sure the spelling for these files is identical with the one in the ttfonts folder.
Step 5
Compress the whole module to a ZIP file and install this on your website using the Joomla installer. Or, alternatively, do not zip the module, transfer the whole module with all subdirectories to your httpdocs/tmp directory on your webserver and use the "install from directory" function of the Joomla installer.
Additional notes
- Please note, that the main component (installed from the installation package) will always overwrite the two files you manually changed (back to the components default). So everytime you update the main component, you will have to update the ttfonts module as well ! So it is best to keep the ttfonts module you changed.
Database import/update/insert/delete
as we are repeatedly (and increasingly) asked whether jDBexport can be used to update the database (either the JOOMLA database or another one), let us clarify this issue...
jDBexport is designed as a data reporting instrument, and as such can only export data, not import - hence the name jDBexport...
jDBexport in it's versionbranch 4.0 (and later) relies on PhpSpreadsheet as underlying library to create spreadsheets (jDBexport 3.1 and 3.2 relied on PHPExcel). This library is capable of reading spreadsheets. However we decided to exclude this part of the library from jDBexport and do not implement any reading feature into jDBexport.
But jDBexport processes SQL statements, doesn't it?
Yes it does, but we actively took steps to prevent jDBexport from processing SQL queries that contain SQL keywords other than those used by SELECT queries. In the components [Options] dialog on the [Advanced] tab you find two configuration options connected to this topic.
- Check SQL
- List of disallowed words
The first option generally activates or deactivates the security check for disallowed words in the finalised SQL queries (e.g. after all substitution variables have been substituted by their actual values).
We recommend strongly, to set this to YES at all times.
The second option lists those words that are considered "disallowed". The following SQL keywords are (by default) disallowed:
ALTER, CREATE, DELETE, DROP, GRANT, INSERT, KILL, LOAD, LOCK, RENAME, REPLACE, REVOKE, SET, TRUNCATE, UPDATE
So if you need to allow certain of these keywords, you could remove them from this list.
Warning
Please keep in mind, that the more permissive you are here in these two options, the more you have to trust everybody who is allowed to access the component's backend administration.
Our demo site at demo.schultz.ch
We run a demo installation at http://demo.schultz.ch, where you can experiment with the component and it's plugins.
The MySQL SAKILA database
MySQL provides a relatively complex database for experimenting, the so called SAKILA database. We installed a copy of this database in our demo site for you. If you need background info on SAKILA, please visit https://dev.mysql.com/doc/sakila/en/
Database schema for SAKILA

The SQLite3 CHINOOK database
SQLite3 provides a relatively complex database for experimenting, the so called CHINOOK database. We installed a copy of this database in our demo site for you. If you need background info on CHINOOK, please visit http://www.sqlitetutorial.net/sqlite-sample-database/
Database schema for CHINOOK
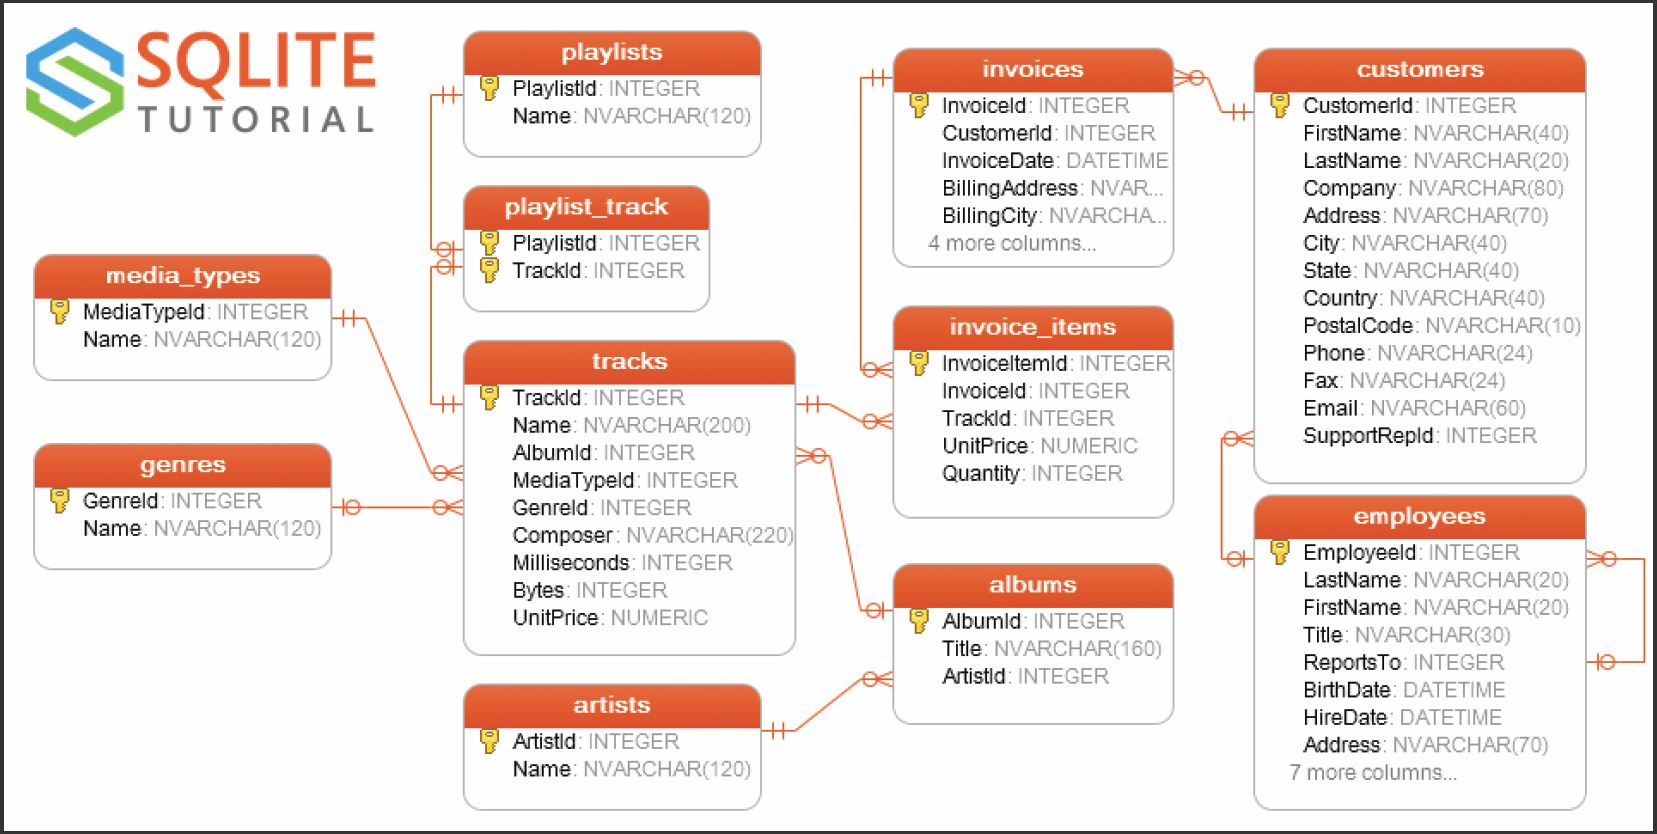
Third party components used
jDBexport depends on various third party products. We list them here for reference and your information, together with the versions of these components we integrated in our most current release (jDBexport V4.0.3)
| Third party component | Version integrated | Remarks |
|---|---|---|
| PhpSpreadsheet spreadsheet creation library (Website) | Version 1.29 | this library requires PHP version 7.2.0 or higher, PHP extension php_zip enabled (if you need PhpSpreadsheet to handle .xlsx .ods or .gnumeric files), PHP extension php_xml enabled, PHP extension php_gd2 enabled (optional, but required for exact column width autocalculation). We deliberatly removed the READ libraries |
| OpenSpout spreadsheet creation library ( Website ) | experimental Version 4.18.0 |
this is a community driven fork of box/spout, a PHP library to read and write spreadsheet files (CSV, XLSX and ODS), in a fast and scalable way. Unlike other file readers or writers, it is capable of processing very large files, while keeping the memory usage really low (less than 3MB). |
| Excel_XML library by Oliver Schwarz | Version 1.1 | A simple export library for dumping array data into an excel readable format |
| mPDF pdf creation library (Website) | Version 8.1.0 | creating pdf documents with PhpSpreadsheet (compatibility issue with Joomla5!) |
| jQuery UI framework | Version 1.13.2 | |
| SPECTRUM (no hassle jQuery color picker) | Version 1.8.1 | |
| (removed in 4.0.4) PHPExcel spreadsheet creation library (Website) |
Version 1.8.1 | removed |
| (removed in 4.0.4) mPDF pdf creation library (Website) |
Version 6.1.0 | removed |
And finally, we warmly thank Mats Fredriksson from joomla-r-us.com, who originally invented this component under the name of SQL2Excel for JOOMLA 1.5
Whatever the reason was, why he could not continue to support his product, we here at Schultz IT Solutions and all the users of jDBexport do owe him a lot !
End of user manual
Copyright Schultz IT Solutions